Epson MX-85 User Manual - Page 31
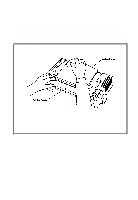
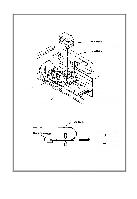
Fig. 22, Replacement of Print Head, Print Head Unit
 |
View all Epson MX-85 manuals
Add to My Manuals
Save this manual to your list of manuals |
Page 31 highlights
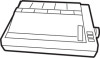
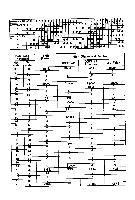
Print Head Unit Head Lock Lever Carriage A&embly (Side View) Terminal Board Head Connector Be sure to hold this connectar firmly to pull the head cable out straight. *Take hold of the cable at the point indicated by arrows and apply force in either of the directions indicated by arrow to push in or pull out the head cable. Fig. 22 Replacement of Print Head -26-
-
 1
1 -
2
-
3
-
4
-
5
-
6
-
7
-
8
-
9
-
10
-
11
-
12
-
13
-
14
-
15
-
16
-
17
-
18
-
19
-
20
-
21
-
22
-
23
-
24
-
25
-
 26
26 -
 27
27 -
 28
28 -
 29
29 -
 30
30 -
 31
31 -
 32
32 -
 33
33 -
 34
34 -
 35
35 -
 36
36
 |
 |

Head Lock Lever
Carriage A&embly
Print Head Unit
Terminal Board
Head Connector
Be sure to hold this
con-
nectar firmly to pull the
head cable out straight.
(Side View)
*Take hold of the cable at
the point indicated by
arrows
force
in
and apply
either
of the
directions indicated by
arrow
to push in or
pull out the head cable.
Fig. 22
Replacement of Print Head
-26-