Epson MegaPlex MG-850HD User Manual - Page 69
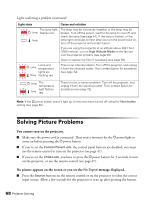
Only part of the picture is displayed, or the picture is distorted.
 |
View all Epson MegaPlex MG-850HD manuals
Add to My Manuals
Save this manual to your list of manuals |
Page 69 highlights
■ Press the A/V mute button on the remote control to make sure the picture hasn't been turned off temporarily. ■ Check that the Ppower light and button are on, that no status lights are flashing, and the lens cover is open. ■ The projector may be in standby (or sleep) mode. If the Ppower button is on and the P power light is off, press the Ppower button to turn the projector back on. ■ Make sure your video equipment is turned on. ■ If you're using an iPod, make sure it is properly seated on the dock and that the Dock light is on (see page 21). ■ Make sure your cable(s) are connected correctly (see page 27). Only part of the picture is displayed, or the picture is distorted. ■ Press the Aspect button to select a different aspect ratio (see page 38). ■ Check the Overscan to make sure it's adjusted correctly (see page 46). You're using a computer and no picture appears on the screen. If you're using a Windows® laptop: 1. Hold down the laptop's Fn key and press the key labelled with a monitor icon or CRT/LCD. (See your laptop manual for details.) Wait a few seconds for an image to appear. 2. To display both on the laptop's monitor and projector, try pressing the same keys again. 3. If the same image is not displayed by the laptop and projector, check the Windows Display utility to make sure the external monitor port is enabled. (See your computer or Windows manual for instructions.) 4. If necessary, check your video card settings and set the multiple display option to Clone. If you're using Mac OS X: 1. Open the System Preferences utility and select Displays. 2. Select the VGA Display or Color LCD option, if necessary. 3. Click the Arrange or Arrangement tab. 4. Check the Mirror Displays checkbox. Solving Picture Problems 69
-
 1
1 -
2
-
3
-
4
-
5
-
6
-
7
-
8
-
9
-
10
-
11
-
12
-
13
-
14
-
15
-
16
-
17
-
18
-
19
-
20
-
21
-
22
-
23
-
24
-
25
-
26
-
27
-
28
-
29
-
30
-
31
-
32
-
33
-
34
-
35
-
36
-
37
-
38
-
39
-
40
-
41
-
42
-
43
-
44
-
45
-
46
-
47
-
48
-
49
-
50
-
51
-
52
-
53
-
54
-
55
-
56
-
57
-
58
-
59
-
60
-
61
-
62
-
63
-
 64
64 -
 65
65 -
 66
66 -
 67
67 -
 68
68 -
 69
69 -
 70
70 -
 71
71 -
 72
72 -
 73
73 -
 74
74 -
75
-
76
-
77
-
78
-
79
-
80
-
81
-
82
-
83
 |
 |