Epson PowerLite Home 20 User Manual - Page 12
screen to obtain the desired image size, as indicated
 |
View all Epson PowerLite Home 20 manuals
Add to My Manuals
Save this manual to your list of manuals |
Page 12 highlights
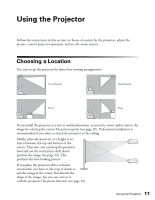
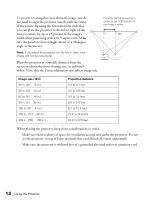
To project a rectangular (non-distored) image, you do not need to align the projector exactly with the center of the screen. By using the horizontal lens shift dial, you can place the projector to the left or right of the screen's center, by up to 25 percent of the image's width when projecting with a 16:9 aspect ratio. Make sure the projector faces straight ahead (at a 90-degree angle to the screen). Note: If you place the projector too far left or right, your image will not be rectangular. Place the projector at a suitable distance from the screen to obtain the desired image size, as indicated below. Note that the Zoom adjustment also affects image size. Projector can be moved from center by up to 25 percent of the image's width 90° Image size (16:9) 30 in. (26 × 15 in.) 40 in. (35 × 20 in.) 60 in. (51 × 28 in.) 80 in. (71 × 39 in.) 100 in. (87 × 47 in.) 200 in. (173 × 98 in.) 300 in. (260 × 146 in.) Projection distance 2.4 to 3.7 feet 3.2 to 4.9 feet 4.9 to 7.4 feet 6.6 to 9.9 feet 8.2 to 12.4 feet 16.5 to 24.8 feet 24.8 to 37.3 feet When placing the projector, keep these considerations in mind: ■ Make sure there is plenty of space for ventilation around and under the projector. Do not set the projector on top of loose materials that could block the vents underneath. ■ Make sure the projector is within 6 feet of a grounded electrical outlet or extension cord. 12 Using the Projector
-
 1
1 -
2
-
3
-
4
-
5
-
6
-
 7
7 -
 8
8 -
 9
9 -
 10
10 -
 11
11 -
 12
12 -
 13
13 -
 14
14 -
 15
15 -
 16
16 -
 17
17 -
18
-
19
-
20
-
21
-
22
-
23
-
24
-
25
-
26
-
27
-
28
-
29
-
30
-
31
-
32
-
33
-
34
-
35
-
36
-
37
-
38
-
39
-
40
-
41
-
42
-
43
-
44
-
45
-
46
-
47
-
48
-
49
-
50
 |
 |
