Epson PowerLite Home 20 User Manual - Page 13
Adjusting the Picture - troubleshooting
 |
View all Epson PowerLite Home 20 manuals
Add to My Manuals
Save this manual to your list of manuals |
Page 13 highlights
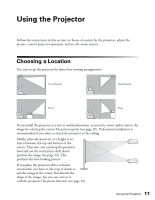
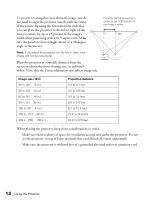
Adjusting the Picture Follow the steps on the Quick Setup sheet to connect the projector to your equipment, turn it on, and select the image source. Once you see your picture, you may need to make certain adjustments. Note: If you don't see a picture, or the picture doesn't look right, see page 34 for troubleshooting instructions. 1. Rotate the focus ring to sharpen the picture, or the zoom ring to reduce or enlarge it. Focus and zoom rings Focus ring Zoom ring 2. If the image is not centered on the screen, use the horizontal and vertical lens shift dials to adjust its position. Up Down Left Right Note: The lens shift feature cannot move the image both horizontally and vertically by the full amount. For example, if you have moved the image all the way up, then you cannot shift it all the way to the right or left at the same time. Using the Projector 13
-
 1
1 -
2
-
3
-
4
-
5
-
6
-
7
-
 8
8 -
 9
9 -
 10
10 -
 11
11 -
 12
12 -
 13
13 -
 14
14 -
 15
15 -
 16
16 -
 17
17 -
 18
18 -
19
-
20
-
21
-
22
-
23
-
24
-
25
-
26
-
27
-
28
-
29
-
30
-
31
-
32
-
33
-
34
-
35
-
36
-
37
-
38
-
39
-
40
-
41
-
42
-
43
-
44
-
45
-
46
-
47
-
48
-
49
-
50
 |
 |
