Epson PowerLite Home Cinema 3010e User's Guide - Page 34
represents the output signal level. Press the, button to exit.
 |
View all Epson PowerLite Home Cinema 3010e manuals
Add to My Manuals
Save this manual to your list of manuals |
Page 34 highlights
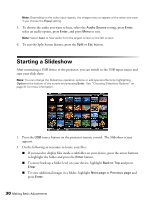
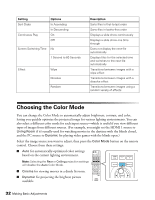
Note: This setting cannot be used when the Color Mode is set to Auto (see page 32). 1. Press the Menu button. Select Image from the main menu. Select Advanced and then Gamma. You see the following displayed on the screen: 2. Do one of the following: ■ Select one of the numeric correction values using the u or d button on the remote control and press the Enter button. You see the setting reflected in the graph on the right. The horizontal axis represents the input signal level, and the vertical axis represents the output signal level. Press the Esc button to exit. ■ Select Customized. Then continue with the next step. 3. Do one of the following: ■ Select Adjust it from the image. You see a gamma icon on the projected image. Use the arrow buttons to move the icon to the area of brightness you want to adjust, then press Enter. The custom gamma graph appears with the channel selected for adjustment. Press the u or d button to adjust and then press Enter to save your setting and exit. ■ Select Adjust it from the graph. When the gamma graph appears, use the l or r button to select the point on the graph that you want to adjust, and then use the u or d button to adjust the settings. Press Enter to save your setting and exit. 4. Press the Menu button to close the menu screen when you're done. 34 Making Basic Adjustments
-
 1
1 -
2
-
3
-
4
-
5
-
6
-
7
-
8
-
9
-
10
-
11
-
12
-
13
-
14
-
15
-
16
-
17
-
18
-
19
-
20
-
21
-
22
-
23
-
24
-
25
-
26
-
27
-
28
-
 29
29 -
 30
30 -
 31
31 -
 32
32 -
 33
33 -
 34
34 -
 35
35 -
 36
36 -
 37
37 -
 38
38 -
 39
39 -
40
-
41
-
42
-
43
-
44
-
45
-
46
-
47
-
48
-
49
-
50
-
51
-
52
-
53
-
54
-
55
-
56
-
57
-
58
-
59
-
60
-
61
-
62
-
63
-
64
-
65
-
66
-
67
-
68
-
69
-
70
-
71
-
72
-
73
-
74
-
75
-
76
-
77
-
78
-
79
-
80
-
81
-
82
-
83
-
84
-
85
-
86
-
87
-
88
 |
 |
