Epson PowerLite Home Cinema 720 User's Guide - PowerLite Home Cinema 720 - Page 58
The picture contains static or noise., Only part of the picture is displayed - lcd
 |
View all Epson PowerLite Home Cinema 720 manuals
Add to My Manuals
Save this manual to your list of manuals |
Page 58 highlights
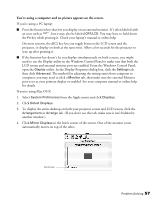
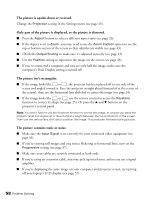
The picture is upside-down or reversed. Change the Projection setting in the Settings menu (see page 45). Only part of the picture is displayed, or the picture is distorted. ■ Press the Aspect button to select a different aspect ratio (see page 26). ■ If the Aspect is set to Zoom, you may need to use the Zoom Caption option to see the top or bottom section of the screen so that subtitles are visible (see page 43). ■ Check the Output Scaling to make sure it's adjusted correctly (see page 43). ■ Use the Position setting to reposition the image on the screen (see page 43). ■ If you've connected a computer and you see only half the image, make sure the computer's Dual Display setting is turned off. The picture isn't rectangular. ■ If the image looks like or , the projector has been placed off to one side of the screen and angled toward it. Face the projector straight ahead (instead of at the center of the screen), then use the horizontal lens shift dial to center the image (see page 24). ■ If the image looks like or , use the remote control to access the Keystone function to correct its shape (see page 25). Or press the u and d buttons on the projector's control panel. Note: You won't have to use the Keystone function to correct the image, as long as you place the projector level (not angled up or down) and at a height between the top and bottom of the screen. Then use the vertical lens shift dial to position the image. This produces the best-looking picture. The picture contains static or noise. ■ Make sure the Input Signal is set correctly for your connected video equipment (see page 45). ■ If you're viewing still images and you notice flickering or horizontal lines, turn on the Progressive setting (see page 37). ■ Make sure your cables are securely connected at both ends. ■ If you're using an extension cable, you may pick up interference unless you use a signal amplifier. ■ If you're displaying the same image on your computer and projector screen, try turning off your laptop's LCD display (see page 57). 58 Problem Solving
-
 1
1 -
2
-
3
-
4
-
5
-
6
-
7
-
8
-
9
-
10
-
11
-
12
-
13
-
14
-
15
-
16
-
17
-
18
-
19
-
20
-
21
-
22
-
23
-
24
-
25
-
26
-
27
-
28
-
29
-
30
-
31
-
32
-
33
-
34
-
35
-
36
-
37
-
38
-
39
-
40
-
41
-
42
-
43
-
44
-
45
-
46
-
47
-
48
-
49
-
50
-
51
-
52
-
 53
53 -
 54
54 -
 55
55 -
 56
56 -
 57
57 -
 58
58 -
 59
59 -
 60
60 -
 61
61 -
 62
62 -
 63
63 -
64
-
65
-
66
-
67
-
68
-
69
-
70
-
71
-
72
-
73
-
74
-
75
-
76
 |
 |
