Epson Stylus COLOR 850Ne User Setup Information - Page 27
Using EPSON Net!2 to Con the Card, in Remote Printer Mode, Print server name, Polling interval
 |
View all Epson Stylus COLOR 850Ne manuals
Add to My Manuals
Save this manual to your list of manuals |
Page 27 highlights
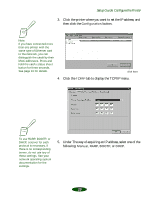
Setup Guide: Configure the Printer Caution: Once you make changes to the Ethernet card, you must wait until it registers the settings before you turn off the printer. Print server name Type any new name up to 47 characters. The default name is shown below. (Printer name) - (last 6 digits of the serial number) Polling interval Set the polling time from 5 to 90 seconds. 5. Click OK to save your changes. If the message "Configuration successfully done" appears on your screen, the update is complete. 6. In the file Server Console's MONITOR.NLM, select the Connection Information. Check if the print server name assigned to the Ethernet card has been logged in to the Active Connections list. It takes up to five minutes to complete this. Using EPSON Net!2 to Configure the Card in Remote Printer Mode Note: If the Status Monitor 2 program is open, or if background monitoring is turned on, it may interfere with EPSON Net!2. Close Status Monitor 2 if it is running and turn off background monitoring, following step 13 on page 15. Follow these steps: 1. From the System Console of the file server where you set the print queue, load the print server module with the following command (use the print server name which you assigned in step 4 under "Using NwAdmin to Set Up Your Printer," on page 17): >Load PSERVER print server name If you have connected more than one printer with the same type of Ethernet card to the network, you can distinguish the cards by their MAC addresses. Press and hold the card's status sheet button for three seconds. See page 10 for details. 25
-
 1
1 -
2
-
3
-
4
-
5
-
6
-
7
-
8
-
9
-
10
-
11
-
12
-
13
-
14
-
15
-
16
-
17
-
18
-
19
-
20
-
21
-
 22
22 -
 23
23 -
 24
24 -
 25
25 -
 26
26 -
 27
27 -
 28
28 -
 29
29 -
 30
30 -
 31
31 -
 32
32 -
33
-
34
-
35
-
36
-
37
-
38
-
39
-
40
-
41
-
42
 |
 |
