Epson Stylus COLOR 900N User Manual - Page 31
Close any open programs and click, Follow these steps to install Status Monitor 2
 |
View all Epson Stylus COLOR 900N manuals
Add to My Manuals
Save this manual to your list of manuals |
Page 31 highlights
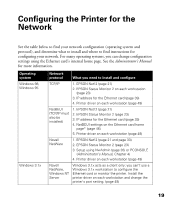
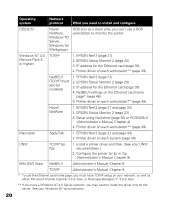
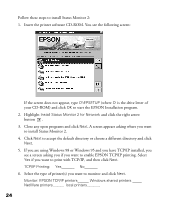
Follow these steps to install Status Monitor 2: 1. Insert the printer software CD-ROM. You see the following screen: If the screen does not appear, type D:\EPSETUP (where D: is the drive letter of your CD-ROM) and click OK to start the EPSON Installation program. 2. Highlight Install Status Monitor 2 for Network and click the right arrow button . 3. Close any open programs and click Next. A screen appears asking where you want to install Status Monitor 2. 4. Click Next to accept the default directory or choose a different directory and click Next. 5. If you are using Windows 98 or Windows 95 and you have TCP/IP installed, you see a screen asking you if you want to enable EPSON TCP/IP printing. Select Yes if you want to print with TCP/IP, and then click Next. TCP/IP Printing: Yes_______ No_______ 6. Select the type of printer(s) you want to monitor and click Next. Monitor: EPSON TCP/IP printers______ Windows shared printers _____ NetWare printers______ local printers_______ 24
-
 1
1 -
2
-
3
-
4
-
5
-
6
-
7
-
8
-
9
-
10
-
11
-
12
-
13
-
14
-
15
-
16
-
17
-
18
-
19
-
20
-
21
-
22
-
23
-
24
-
25
-
 26
26 -
 27
27 -
 28
28 -
 29
29 -
 30
30 -
 31
31 -
 32
32 -
 33
33 -
 34
34 -
 35
35 -
 36
36 -
37
-
38
-
39
-
40
-
41
-
42
-
43
-
44
-
45
-
46
-
47
-
48
-
49
-
50
-
51
-
52
-
53
-
54
-
55
-
56
-
57
-
58
-
59
-
60
-
61
-
62
-
63
-
64
-
65
-
66
-
67
-
68
-
69
-
70
-
71
-
72
-
73
-
74
-
75
-
76
-
77
-
78
-
79
-
80
-
81
-
82
-
83
-
84
-
85
-
86
-
87
-
88
-
89
-
90
-
91
-
92
-
93
-
94
-
95
-
96
-
97
-
98
-
99
-
100
-
101
-
102
-
103
-
104
-
105
-
106
-
107
-
108
-
109
-
110
-
111
-
112
-
113
-
114
-
115
-
116
-
117
-
118
-
119
-
120
-
121
-
122
-
123
-
124
-
125
 |
 |
