Epson Stylus COLOR 900N User Manual - Epson Stylus RIP Mac & PC - Page 46
At the Install PostScript Printer from PPD dialog box
 |
View all Epson Stylus COLOR 900N manuals
Add to My Manuals
Save this manual to your list of manuals |
Page 46 highlights
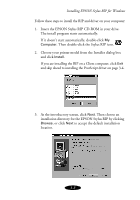
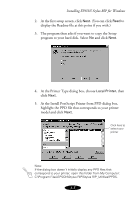
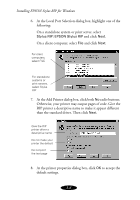
Installing EPSON Stylus RIP for Windows 2. At the first setup screen, click Next. (You can click Read to display the Readme file at this point if you wish.) 3. The program then asks if you want to copy the Setup program to your hard disk. Select No and click Next. 4. At the Printer Type dialog box, choose Local Printer, then click Next. 5. At the Install PostScript Printer from PPD dialog box, highlight the PPD file that corresponds to your printer model and click Next. Click here to select your printer Note: If the dialog box doesn’t initially display any PPD files that correspond to your printer, open this folder from My Computer: C:\Program Files\EPSON\Stylus RIP\Stylus RIP_Utilities\PPDS. 3-5
-
 1
1 -
2
-
3
-
4
-
5
-
6
-
7
-
8
-
9
-
10
-
11
-
12
-
13
-
14
-
15
-
16
-
17
-
18
-
19
-
20
-
21
-
22
-
23
-
24
-
25
-
26
-
27
-
28
-
29
-
30
-
31
-
32
-
33
-
34
-
35
-
36
-
37
-
38
-
39
-
40
-
 41
41 -
 42
42 -
 43
43 -
 44
44 -
 45
45 -
 46
46 -
 47
47 -
 48
48 -
 49
49 -
 50
50 -
 51
51 -
52
-
53
-
54
-
55
-
56
-
57
-
58
-
59
-
60
-
61
-
62
-
63
-
64
-
65
-
66
-
67
-
68
-
69
-
70
-
71
-
72
-
73
-
74
-
75
-
76
-
77
-
78
-
79
 |
 |

3-5
Installing EPSON Stylus RIP for Windows
2.
At the first setup screen, click
Next
. (You can click
Read
to
display the Readme file at this point if you wish.)
3.
The program then asks if you want to copy the Setup
program to your hard disk. Select
No
and click
Next
.
4.
At the Printer Type dialog box, choose
Local Printer
, then
click
Next
.
5.
At the Install PostScript Printer from PPD dialog box,
highlight the PPD file that corresponds to your printer
model and click
Next
.
Note:
If the dialog box doesn±t initially display any PPD files that
correspond to your printer, open this folder from My Computer:
C:\Program Files\EPSON\Stylus RIP\Stylus RIP_Utilities\PPDS.
Click here to
select your
printer