Epson Stylus NX230 User Guide - Page 124
Replacing Ink Cartridges Using a Computer Utility, Print & Scan - replace ink
 |
View all Epson Stylus NX230 manuals
Add to My Manuals
Save this manual to your list of manuals |
Page 124 highlights
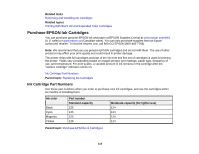
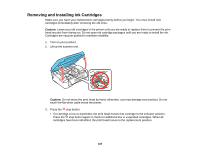
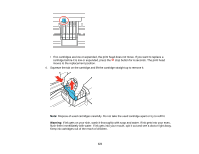
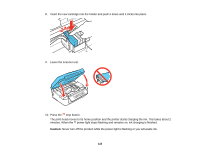
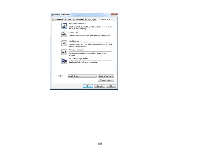
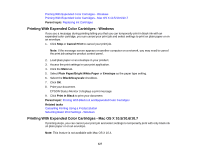
Note: If the ink light is on after the print head moves to its home position or the power light is still flashing 3 minutes after replacing a cartridge, an ink cartridge may not be installed properly. Press the stop button, then press the ink cartridge down until it clicks into place. If you remove a low or expended ink cartridge, you cannot re-install and use the cartridge. Caution: If you remove an ink cartridge for later use, protect the ink supply area from dirt and dust and store it in the same environment as the printer. The valve in the ink supply port is designed to contain any excess ink, but do not touch the ink supply port or surrounding area. Always store ink cartridges with the label facing up; do not store cartridges upside-down. Parent topic: Replacing Ink Cartridges Related concepts Purchase EPSON Ink Cartridges Replacing Ink Cartridges Using a Computer Utility You can use the Ink Cartridge Replacement utility to view on-screen instructions for replacing an ink cartridge. This method allows you to replace a cartridge before it is low or expended (if it is too old, for example). 1. Do one of the following: • Windows: Right-click the product icon in the Windows taskbar and select Printer Settings. Then click the Maintenance tab. • Mac OS X 10.6/10.7: In the Apple menu or the Dock, select System Preferences. Select Print & Fax or Print & Scan, select your product, and select Options & Supplies. Select Utility and select Open Printer Utility. • Mac OS X 10.4/10.5: In the Apple menu or the Dock, select System Preferences. Select Print & Fax, select your product, and select Open Print Queue or Print Queue. Select Utility. You see one of these windows: 124
-
 1
1 -
2
-
3
-
4
-
5
-
6
-
7
-
8
-
9
-
10
-
11
-
12
-
13
-
14
-
15
-
16
-
17
-
18
-
19
-
20
-
21
-
22
-
23
-
24
-
25
-
26
-
27
-
28
-
29
-
30
-
31
-
32
-
33
-
34
-
35
-
36
-
37
-
38
-
39
-
40
-
41
-
42
-
43
-
44
-
45
-
46
-
47
-
48
-
49
-
50
-
51
-
52
-
53
-
54
-
55
-
56
-
57
-
58
-
59
-
60
-
61
-
62
-
63
-
64
-
65
-
66
-
67
-
68
-
69
-
70
-
71
-
72
-
73
-
74
-
75
-
76
-
77
-
78
-
79
-
80
-
81
-
82
-
83
-
84
-
85
-
86
-
87
-
88
-
89
-
90
-
91
-
92
-
93
-
94
-
95
-
96
-
97
-
98
-
99
-
100
-
101
-
102
-
103
-
104
-
105
-
106
-
107
-
108
-
109
-
110
-
111
-
112
-
113
-
114
-
115
-
116
-
117
-
118
-
 119
119 -
 120
120 -
 121
121 -
 122
122 -
 123
123 -
 124
124 -
 125
125 -
 126
126 -
 127
127 -
 128
128 -
 129
129 -
130
-
131
-
132
-
133
-
134
-
135
-
136
-
137
-
138
-
139
-
140
-
141
-
142
-
143
-
144
-
145
-
146
-
147
-
148
-
149
-
150
-
151
-
152
-
153
-
154
-
155
-
156
-
157
-
158
-
159
-
160
-
161
-
162
-
163
-
164
-
165
-
166
-
167
-
168
-
169
-
170
-
171
-
172
-
173
-
174
-
175
-
176
-
177
-
178
-
179
-
180
-
181
-
182
-
183
-
184
-
185
-
186
-
187
-
188
-
189
-
190
-
191
 |
 |