Epson Stylus NX230 User Guide - Page 144
Lower the scanner unit., Remove all the paper from the product.
 |
View all Epson Stylus NX230 manuals
Add to My Manuals
Save this manual to your list of manuals |
Page 144 highlights
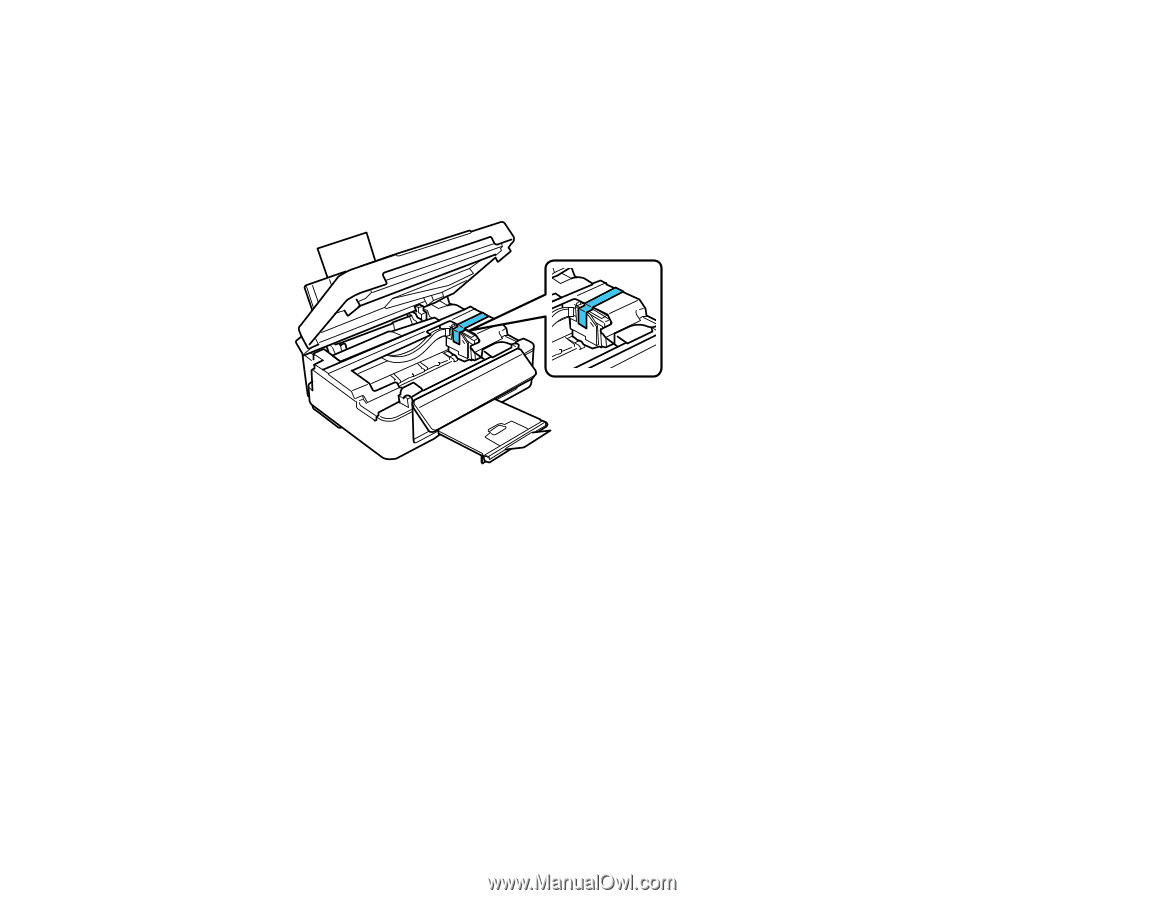
• Do not carry the product by its control panel; this may damage the product. 1. Turn off the product. 2. Lift up the scanner unit and check to see if the print head is in the far right position (the home position). If not, turn on the product, wait for the print head to move, then turn the product off again. 3. Secure the ink cartridge holder to the case with tape. Caution: Do not place tape on the white flat cable inside the product; otherwise, you may damage your product. 4. Lower the scanner unit. 5. Remove all the paper from the product. 6. Unplug any connected cables. 7. Close the output tray and paper support. 144
-
 1
1 -
2
-
3
-
4
-
5
-
6
-
7
-
8
-
9
-
10
-
11
-
12
-
13
-
14
-
15
-
16
-
17
-
18
-
19
-
20
-
21
-
22
-
23
-
24
-
25
-
26
-
27
-
28
-
29
-
30
-
31
-
32
-
33
-
34
-
35
-
36
-
37
-
38
-
39
-
40
-
41
-
42
-
43
-
44
-
45
-
46
-
47
-
48
-
49
-
50
-
51
-
52
-
53
-
54
-
55
-
56
-
57
-
58
-
59
-
60
-
61
-
62
-
63
-
64
-
65
-
66
-
67
-
68
-
69
-
70
-
71
-
72
-
73
-
74
-
75
-
76
-
77
-
78
-
79
-
80
-
81
-
82
-
83
-
84
-
85
-
86
-
87
-
88
-
89
-
90
-
91
-
92
-
93
-
94
-
95
-
96
-
97
-
98
-
99
-
100
-
101
-
102
-
103
-
104
-
105
-
106
-
107
-
108
-
109
-
110
-
111
-
112
-
113
-
114
-
115
-
116
-
117
-
118
-
119
-
120
-
121
-
122
-
123
-
124
-
125
-
126
-
127
-
128
-
129
-
130
-
131
-
132
-
133
-
134
-
135
-
136
-
137
-
138
-
 139
139 -
 140
140 -
 141
141 -
 142
142 -
 143
143 -
 144
144 -
 145
145 -
 146
146 -
 147
147 -
 148
148 -
 149
149 -
150
-
151
-
152
-
153
-
154
-
155
-
156
-
157
-
158
-
159
-
160
-
161
-
162
-
163
-
164
-
165
-
166
-
167
-
168
-
169
-
170
-
171
-
172
-
173
-
174
-
175
-
176
-
177
-
178
-
179
-
180
-
181
-
182
-
183
-
184
-
185
-
186
-
187
-
188
-
189
-
190
-
191
 |
 |
• Do not carry the product by its control panel; this may damage the product.
1.
Turn off the product.
2.
Lift up the scanner unit and check to see if the print head is in the far right position (the home
position). If not, turn on the product, wait for the print head to move, then turn the product off again.
3.
Secure the ink cartridge holder to the case with tape.
Caution:
Do not place tape on the white flat cable inside the product; otherwise, you may damage
your product.
4.
Lower the scanner unit.
5.
Remove all the paper from the product.
6.
Unplug any connected cables.
7.
Close the output tray and paper support.
144