Epson Stylus NX230 User Guide - Page 174
Scanned Image Edges are Cropped, When to Uninstall Your Product Software - installation instructions
 |
View all Epson Stylus NX230 manuals
Add to My Manuals
Save this manual to your list of manuals |
Page 174 highlights
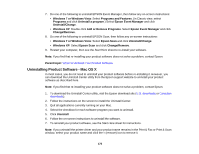
Related concepts Image Preview Guidelines Related tasks Selecting a Scan Area - Home Mode Selecting a Scan Area - Office Mode Selecting a Scan Area - Professional Mode Scanned Image Edges are Cropped If the edges of a scanned image are cropped, make sure your original is placed correctly for scanning. If necessary, move your original away from the edges of the scanner glass slightly. Parent topic: Solving Scanned Image Quality Problems Related tasks Placing Originals on the Scanner Glass When to Uninstall Your Product Software If you have a problem that requires you to uninstall and re-install your software, follow the instructions for your operating system. Uninstalling Product Software - Windows Uninstalling Product Software - Mac OS X Parent topic: Solving Problems Uninstalling Product Software - Windows You can uninstall and then re-install your product software to solve certain problems. 1. Turn off the product. 2. Disconnect any interface cables. 3. Click or Start, and select All Programs or Programs. 4. Select EPSON, select your product, then click EPSON Printer Software Uninstall. Note: If you see a User Account Control window, click Yes or Continue. 5. In the next window, select your product and click OK. Then follow any on-screen instructions. 6. Open the Windows Control Panel utility. 174
-
 1
1 -
2
-
3
-
4
-
5
-
6
-
7
-
8
-
9
-
10
-
11
-
12
-
13
-
14
-
15
-
16
-
17
-
18
-
19
-
20
-
21
-
22
-
23
-
24
-
25
-
26
-
27
-
28
-
29
-
30
-
31
-
32
-
33
-
34
-
35
-
36
-
37
-
38
-
39
-
40
-
41
-
42
-
43
-
44
-
45
-
46
-
47
-
48
-
49
-
50
-
51
-
52
-
53
-
54
-
55
-
56
-
57
-
58
-
59
-
60
-
61
-
62
-
63
-
64
-
65
-
66
-
67
-
68
-
69
-
70
-
71
-
72
-
73
-
74
-
75
-
76
-
77
-
78
-
79
-
80
-
81
-
82
-
83
-
84
-
85
-
86
-
87
-
88
-
89
-
90
-
91
-
92
-
93
-
94
-
95
-
96
-
97
-
98
-
99
-
100
-
101
-
102
-
103
-
104
-
105
-
106
-
107
-
108
-
109
-
110
-
111
-
112
-
113
-
114
-
115
-
116
-
117
-
118
-
119
-
120
-
121
-
122
-
123
-
124
-
125
-
126
-
127
-
128
-
129
-
130
-
131
-
132
-
133
-
134
-
135
-
136
-
137
-
138
-
139
-
140
-
141
-
142
-
143
-
144
-
145
-
146
-
147
-
148
-
149
-
150
-
151
-
152
-
153
-
154
-
155
-
156
-
157
-
158
-
159
-
160
-
161
-
162
-
163
-
164
-
165
-
166
-
167
-
168
-
 169
169 -
 170
170 -
 171
171 -
 172
172 -
 173
173 -
 174
174 -
 175
175 -
 176
176 -
 177
177 -
 178
178 -
 179
179 -
180
-
181
-
182
-
183
-
184
-
185
-
186
-
187
-
188
-
189
-
190
-
191
 |
 |
