Epson Stylus Pro 10000 - Photographic Dye Ink Product Support Bulletin(s) - Page 36
IP Printing Installation, Applications, Utilities, IP Printing, Use default queue on server, Printer
 |
View all Epson Stylus Pro 10000 - Photographic Dye Ink manuals
Add to My Manuals
Save this manual to your list of manuals |
Page 36 highlights
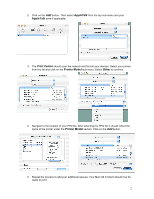
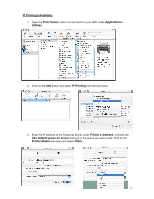
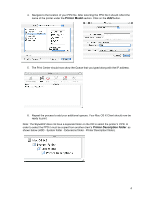
IP Printing Installation: 1. Open the Print Center, which can be found on your HDD under Applications - Utilities 2. Click on the Add button and select IP Printing from the sub-menu. 3. Enter the IP Address of the Postscript Server under Printer's Address. Uncheck the Use default queue on server and type in the queue you wish to add. Click on the Printer Model sub-menu and select Other. 3
-
 1
1 -
2
-
3
-
4
-
5
-
6
-
7
-
8
-
9
-
10
-
11
-
12
-
13
-
14
-
15
-
16
-
17
-
18
-
19
-
20
-
21
-
22
-
23
-
24
-
25
-
26
-
27
-
28
-
29
-
30
-
 31
31 -
 32
32 -
 33
33 -
 34
34 -
 35
35 -
 36
36 -
 37
37 -
 38
38 -
 39
39 -
 40
40 -
 41
41 -
42
-
43
-
44
-
45
-
46
-
47
-
48
-
49
-
50
-
51
-
52
-
53
-
54
-
55
-
56
-
57
-
58
-
59
-
60
-
61
-
62
-
63
-
64
-
65
-
66
-
67
-
68
-
69
-
70
-
71
-
72
-
73
-
74
-
75
-
76
-
77
-
78
-
79
-
80
-
81
-
82
-
83
-
84
 |
 |

3
IP Printing Installation:
1.
Open the
Print Center
, which can be found on your HDD under
Applications -
Utilities
2. Click on the
Add
button and select
IP Printing
from the sub-menu.
3.
Enter the IP Address of the Postscript Server under
Printer’s Address
. Uncheck the
Use default queue on server
and type in the queue you wish to add. Click on the
Printer Model
sub-menu and select
Other
.