Epson Stylus Pro 10000 - Photographic Dye Ink Product Support Bulletin(s) - Page 59
Add Standard TCP/IP Printer Port Wizard
 |
View all Epson Stylus Pro 10000 - Photographic Dye Ink manuals
Add to My Manuals
Save this manual to your list of manuals |
Page 59 highlights
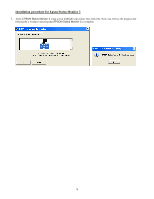
6. At the Add Standard TCP/IP Printer Port Wizard, screen click on Next. Then on the next screen type the Type B Ethernet card's IP address. Check with your System Administrator for the correct IP address assigned to the Epson Type B Ethernet card on your network. 7. If Windows identifies the Epson card automatically, click Finish at the Completing the Add Standard TCP/IP Printer Port Wizard. If your card is not identifies as an Epson network card automatically, click on Custom and then Settings. On the next screen select LPR, type PASSTHRU as the Queue Name, check SNMP Status Enabled and click OK. Click Next on the Add Standard TCP/IP Printer Port Wizard screen to continue with the installation, and then click Finish on the next screen. Click Close at the Printer Ports screen. 7
-
 1
1 -
2
-
3
-
4
-
5
-
6
-
7
-
8
-
9
-
10
-
11
-
12
-
13
-
14
-
15
-
16
-
17
-
18
-
19
-
20
-
21
-
22
-
23
-
24
-
25
-
26
-
27
-
28
-
29
-
30
-
31
-
32
-
33
-
34
-
35
-
36
-
37
-
38
-
39
-
40
-
41
-
42
-
43
-
44
-
45
-
46
-
47
-
48
-
49
-
50
-
51
-
52
-
53
-
 54
54 -
 55
55 -
 56
56 -
 57
57 -
 58
58 -
 59
59 -
 60
60 -
 61
61 -
 62
62 -
 63
63 -
 64
64 -
65
-
66
-
67
-
68
-
69
-
70
-
71
-
72
-
73
-
74
-
75
-
76
-
77
-
78
-
79
-
80
-
81
-
82
-
83
-
84
 |
 |
