Epson Stylus Pro 10000 - Photographic Dye Ink Product Support Bulletin(s) - Page 58
Start, Control Panel, Printers and Other Hardware, Printers and Faxes, Ports, Printer Ports,
 |
View all Epson Stylus Pro 10000 - Photographic Dye Ink manuals
Add to My Manuals
Save this manual to your list of manuals |
Page 58 highlights
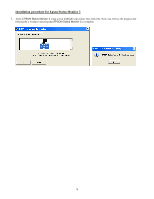
4. Power ON your printer next, then you will need to redirect the port to the Type B Ethernet card's IP address. Click on the Start button, then Control Panel followed by Printers and Other Hardware then go to Printers and Faxes. Right click on the printer icon and choose Properties from the pop-up menu. 5. At the printer properties screen, click on Ports and then on the Add Port... button. On the Printer Ports screen, highlight Standard TCP/IP Port and click on New Port. 6
-
 1
1 -
2
-
3
-
4
-
5
-
6
-
7
-
8
-
9
-
10
-
11
-
12
-
13
-
14
-
15
-
16
-
17
-
18
-
19
-
20
-
21
-
22
-
23
-
24
-
25
-
26
-
27
-
28
-
29
-
30
-
31
-
32
-
33
-
34
-
35
-
36
-
37
-
38
-
39
-
40
-
41
-
42
-
43
-
44
-
45
-
46
-
47
-
48
-
49
-
50
-
51
-
52
-
 53
53 -
 54
54 -
 55
55 -
 56
56 -
 57
57 -
 58
58 -
 59
59 -
 60
60 -
 61
61 -
 62
62 -
 63
63 -
64
-
65
-
66
-
67
-
68
-
69
-
70
-
71
-
72
-
73
-
74
-
75
-
76
-
77
-
78
-
79
-
80
-
81
-
82
-
83
-
84
 |
 |

6
4.
Power ON
your printer next, then you will need to redirect the port to the Type B Ethernet card’s IP address. Click on the
Start
button, then
Control Panel
followed by
Printers and Other Hardware
then go to
Printers and Faxes
. Right click on
the printer icon and choose
Properties
from the pop-up menu.
5.
At the printer properties screen, click on
Ports
and then on the
Add Port…
button. On the
Printer Ports
screen, highlight
Standard TCP/IP Port
and click on
New Port
.