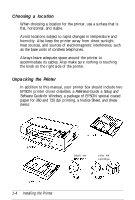
Epson Stylus Pro User Setup Information - Mac - Page 19
Plugging In and Turning On the Printer
 |
View all Epson Stylus Pro manuals
Add to My Manuals
Save this manual to your list of manuals |
Page 19 highlights
2. Install the output tray on top of the paper tray. The sides of the output tray fit over the sides of the paper tray. Plugging In and Turning On the Printer 1. Make sure you have removed all protective packing materials from inside the printer. (See the Notice Sheet for more information.) 2. Make sure the printer is turned off by checking the position of the Operate button. The button is in the off position when its surface is even with the button protectors on each side, as shown below. 1-6 Installing the Printer
-
 1
1 -
2
-
3
-
4
-
5
-
6
-
7
-
8
-
9
-
10
-
11
-
12
-
13
-
 14
14 -
 15
15 -
 16
16 -
 17
17 -
 18
18 -
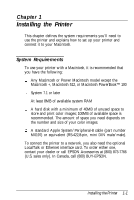
 19
19 -
 20
20 -
 21
21 -
 22
22 -
 23
23 -
 24
24 -
25
-
26
-
27
-
28
-
29
-
30
-
31
-
32
-
33
-
34
-
35
-
36
-
37
-
38
-
39
-
40
-
41
-
42
-
43
-
44
-
45
-
46
-
47
-
48
-
49
-
50
-
51
-
52
 |
 |

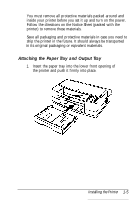
2.
Install the output tray on top of the paper tray. The sides of
the output tray fit over the sides of the paper tray.
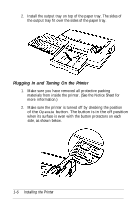
Plugging In and Turning On the Printer
1.
Make sure you have removed all protective packing
materials from inside the printer. (See the Notice Sheet for
more information.)
2.
Make sure the printer is turned off by checking the position
of the
Operate
button. The button is in the off position
when its surface is even with the button protectors on each
side, as shown below.
1-6
Installing the Printer