Epson Stylus Pro User Setup Information - Mac - Page 22
the back of the printer. The color cartridge, which is larger
 |
View all Epson Stylus Pro manuals
Add to My Manuals
Save this manual to your list of manuals |
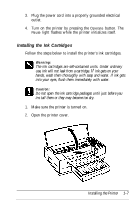
Page 22 highlights
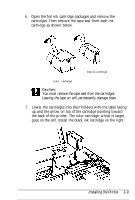
6. Open the foil ink cartridge packages and remove the cartridges. Then remove the tape seal from each ink cartridge as shown below. black cartridge color cartridge Caution: You must remove the tape seal from the cartridges. Leaving the tape on will permanently damage them. 7. Lower the cartridges into their holders with the label facing up and the arrow on top of the cartridge pointing toward the back of the printer. The color cartridge, which is larger, goes on the left. Install the black ink cartridge on the right. Installing the Printer 1-9
-
 1
1 -
2
-
3
-
4
-
5
-
6
-
7
-
8
-
9
-
10
-
11
-
12
-
13
-
14
-
15
-
16
-
 17
17 -
 18
18 -
 19
19 -
 20
20 -
 21
21 -
 22
22 -
 23
23 -
 24
24 -
 25
25 -
 26
26 -
 27
27 -
28
-
29
-
30
-
31
-
32
-
33
-
34
-
35
-
36
-
37
-
38
-
39
-
40
-
41
-
42
-
43
-
44
-
45
-
46
-
47
-
48
-
49
-
50
-
51
-
52
 |
 |

6.
Open the foil ink cartridge packages and remove the
cartridges. Then remove the tape seal from each ink
cartridge as shown below.
black cartridge
color cartridge
Caution:
You must remove the tape seal from the cartridges.
Leaving the tape on will permanently damage them.
7.
Lower the cartridges into their holders with the label facing
up and the arrow on top of the cartridge pointing toward
the back of the printer. The color cartridge, which is larger,
goes on the left. Install the black ink cartridge on the right.
Installing the Printer
1-9