Epson SureColor P600 Basics and Warranty
Epson SureColor P600 Manual
 |
View all Epson SureColor P600 manuals
Add to My Manuals
Save this manual to your list of manuals |
Epson SureColor P600 manual content summary:
- Epson SureColor P600 | Basics and Warranty - Page 1
Epson® SureColor® P600 Series Basics - Epson SureColor P600 | Basics and Warranty - Page 2
or alterations to this product, or (excluding the U.S.) failure to strictly comply with Seiko Epson Corporation's operating and maintenance instructions. Seiko Epson Corporation shall not be liable for any damages or problems arising from the use of any options or any consumable products other than - Epson SureColor P600 | Basics and Warranty - Page 3
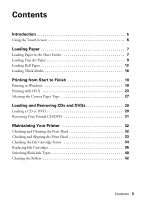
Loading a CD or DVD 29 Removing Your Printed CD/DVD 31 Maintaining Your Printer 32 Checking and Cleaning the Print Head 32 Checking and Aligning the Print Head 33 Checking the Ink Cartridge Status 34 Replacing Ink Cartridges 36 Switching Black Ink Types 40 Cleaning the Rollers 42 Contents 3 - Epson SureColor P600 | Basics and Warranty - Page 4
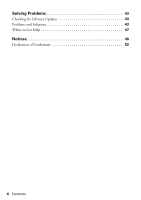
Solving Problems 43 Checking for Software Updates 43 Problems and Solutions 43 Where to Get Help 47 Notices 48 Declaration of Conformity 52 4 Contents - Epson SureColor P600 | Basics and Warranty - Page 5
Introduction Your Epson® SureColor® P600 Series printer gives you exhibition quality prints on a wide variety of glossy and matte papers in many sizes. Your outstanding printouts result from these advanced features: ■ Epson UltraChrome® HD ink cartridges for unprecedented gray balance, outstanding - Epson SureColor P600 | Basics and Warranty - Page 6
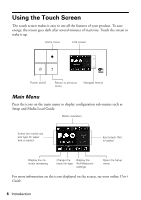
sub-menus such as Setup and Media Load Guide. Status indicators Select the media size and type for paper that is loaded Eject paper that is loaded Display the ink levels remaining Change the Display the black ink type Wi-Fi/Network settings Open the Setup menu For - Epson SureColor P600 | Basics and Warranty - Page 7
the manual feed tray for fine art papers (see page 9) and thick media such as poster board (see page 16). To print multiple photos, photos, presentations, and creative projects. You can purchase genuine Epson ink and paper at Epson Supplies Central® at www.epson.com/ink3 (U.S. sales) or www.epson - Epson SureColor P600 | Basics and Warranty - Page 8
Premium Presentation Paper Matte Epson Premium Presentation Paper Matte Double-sided Epson Photo Quality Self-adhesive Sheets Maximum sheets by size 30 (4 × 6 inch or Letter) 10 (Super B) 30 (8 × 10 inch or Letter) 10 (11 × 14 inch, A3, or Super B) 1 sheet 1. Open the paper support and pull up the - Epson SureColor P600 | Basics and Warranty - Page 9
. Note: The edge guide may move slightly during paper feeding and printing. Do not adjust it while printing is in progress. Loading Fine Art Paper You can print professional quality photos on these paper types using the manual feed tray: ■ Epson Velvet Fine Art Paper ■ Epson Hot Press Bright - Epson SureColor P600 | Basics and Warranty - Page 10
1. Turn on the printer. 2. Remove any paper from the sheet feeder and close the paper support. Remove roll paper if it's currently being used. 3. Open the rear support and extend it fully. 4. Open the front cover, then push the center of the manual feed tray to extend it. 5. Insert a single sheet of - Epson SureColor P600 | Basics and Warranty - Page 11
, no matter which way your photo faces. Check the paper package for any additional loading instructions. 6. Feed the paper up to the line on the tray. Make sure the paper is flush against the right. 7. Press Load on the touch screen. The paper loads inside the printer. 8. When you see the message - Epson SureColor P600 | Basics and Warranty - Page 12
press Yes to confirm. Loading Roll Paper You can load 13-inch wide roll paper for printing large images, panoramic images, or multiple photos, with or without borders. Tip: It's a good idea to check the ink status and replace cartridges, if necessary, before printing a large print job (see page 34 - Epson SureColor P600 | Basics and Warranty - Page 13
the end of the roll. Make sure the paper is cut straight across to avoid paper feeding problems. Note: Avoid touching the surface of your paper. With canvas media that you have previously and right), as viewed from the front of the printer. 6. Open the rear support but don't extend it. Loading Paper - Epson SureColor P600 | Basics and Warranty - Page 14
. 8. Feed the paper into the printer until it meets resistance. In a few seconds, the paper loads automatically. Note: When loading canvas media, leave slack in the roll as it feeds and prints for the best results. If you have trouble feeding canvas media, check that the edge is straight and reload - Epson SureColor P600 | Basics and Warranty - Page 15
2. Use scissors to cut the paper along the cut line. 3. Follow the instructions on the screen to unload the paper. Turn the knobs on the roll paper as the paper unloads, then remove the paper and holders from the printer. Store unused roll paper in its original package away from high temperatures, - Epson SureColor P600 | Basics and Warranty - Page 16
to leave at least 13 inches (32 cm) of space behind the printer for the media to feed through. 1. Turn on the printer. 2. Remove any roll paper or paper loaded in the sheet feeder. Close the rear support if it's open. 3. Open the front cover, then push the center of the manual feed tray to - Epson SureColor P600 | Basics and Warranty - Page 17
: Never try to load media from the rear, or you could damage the printer. 5. Feed the paper up to the line on the tray. Make sure the Poster Board - Load on the printer's touch screen. The paper loads inside the printer. 7. When you see a message on the screen, close the manual feed tray. Push it in - Epson SureColor P600 | Basics and Warranty - Page 18
8. Extend the output tray. Note: To eject paper, press Eject on the main menu, then follow the touch screen instructions. Do not extend the manual feed tray while printing, or you may damage the printer. 18 Loading Paper - Epson SureColor P600 | Basics and Warranty - Page 19
directly onto ink jet-printable CDs or DVDs. See page 29 and the online User's Guide for details. Tip: It's a good idea to check for updates to your Epson SureColor P600 Series software. See "Checking for Software Updates" on page 43 for instructions. Printing in Windows 1. Open a photo or document - Epson SureColor P600 | Basics and Warranty - Page 20
than necessary, set the printer to the type of black ink you usually use (see page 40). 4. For the Color setting, select Color for any type of photographic printing. To print black-and-white photos using Advanced B&W Photo mode, see your online User's Guide for instructions. 20 Printing from Start - Epson SureColor P600 | Basics and Warranty - Page 21
levels: ■ LEVEL 1 for fast printing with draft quality. ■ LEVEL 2 for everyday text and image printing. ■ LEVEL 3 for photos and graphics with good print quality and speed. ■ LEVEL 4 for photos and graphics with high print quality and slower speed. ■ LEVEL 5 for the best print quality and slowest - Epson SureColor P600 | Basics and Warranty - Page 22
in the printer driver. Note: For color management instructions, see epson.com/proimaging photos or banners over 27 inches (68.6 cm) long. If desired, click Save Roll Paper to reduce the amount of roll paper between each banner. ■ Front - Fine Art: for a sheet of compatible paper loaded in the manual - Epson SureColor P600 | Basics and Warranty - Page 23
online User's Guide for details.) 11. Click OK to save your settings. 12. Click OK or Print to start printing. This window appears and shows the progress of your print job. Cancel printing Note: If you're printing on roll paper, see page 15 for instructions on removing your printed photos and paper - Epson SureColor P600 | Basics and Warranty - Page 24
2. Select your product as the Printer setting. Select your Epson product 3. Click Show Details. 4. Select the Paper Size setting for the paper size and source you are using: ■ To print a borderless photo, select a paper size with a Borderless option. ■ To print on roll paper, create a custom paper - Epson SureColor P600 | Basics and Warranty - Page 25
than necessary, set the printer to the type of black ink you usually use (see page 40). 8. For the Color setting, select AccuPhoto HD2 for any type of photographic printing. To print black-and-white photos using Advanced B&W Photo mode, see your online User's Guide for instructions. 9. Select one of - Epson SureColor P600 | Basics and Warranty - Page 26
instructions, see epson.com/proimaging/iccprofiles.html. For more information about print settings, click Help or see your online User's Guide printer icon in the dock. Pause or resume printing Note: If you're printing on roll paper, see page 15 for instructions on removing your printed photos and - Epson SureColor P600 | Basics and Warranty - Page 27
type listed in the printer driver, see the tables below. Media usable with Photo Black ink (see page 40): For this paper/media Plain paper Epson Bright White Paper Epson Photo Paper Glossy Epson Premium Photo Paper Glossy Epson Ultra Premium Photo Paper Glossy Epson Premium Photo Paper Semi-gloss - Epson SureColor P600 | Basics and Warranty - Page 28
White Paper Plain Paper/Bright White Paper* Epson Presentation Paper Matte Presentation Paper Matte Epson Premium Presentation Paper Matte Epson Ultra Premium Presentation Paper Matte Epson Premium Presentation Paper Matte Double-sided Epson Photo Quality Self-adhesive Sheets Ultra Premium - Epson SureColor P600 | Basics and Warranty - Page 29
use your P600 Series and the Epson Print CD software that came with it to print label designs directly onto ink jet- Guide for instructions on printing on a CD/ DVD. Loading a CD or DVD 1. Turn on the printer. 2. Remove any roll paper or paper loaded in the sheet feeder. Close the rear support - Epson SureColor P600 | Basics and Warranty - Page 30
3. Open the front cover, then push the center of the manual feed tray to extend it. 4. Place your disc on the included CD/DVD tray with the label side up. 5. Place the CD/DVD tray on the manual feed tray. 30 Loading and Removing CDs and DVDs - Epson SureColor P600 | Basics and Warranty - Page 31
P600 Series. Pull out the tray and remove the disc. After printing, handle the printed CD or DVD carefully. You may need to wait up to 24 hours for the ink User's Guide for instructions. If you notice lines or streaks on your CD or DVD, you may need to clean the rollers inside the printer. See - Epson SureColor P600 | Basics and Warranty - Page 32
Printer Follow the steps in these sections to keep the P600 Series working at its best: ■ "Checking and Cleaning the Print Head" below ■ "Checking and Aligning the Print Head" on page 33 ■ "Checking the Ink Cartridge Status" on page 34 ■ "Replacing Ink Cartridges" on page 36 ■ "Switching Black Ink - Epson SureColor P600 | Basics and Warranty - Page 33
: You cannot clean the print head if an ink cartridge is expended, and may not be able to clean it when a cartridge is low. You must replace the cartridge first (see page 36). 1. Load a few sheets of plain paper. 2. Press the button or tap the printer's touch screen to open the main menu. 3. Press - Epson SureColor P600 | Basics and Warranty - Page 34
connected to the Internet, you may see a screen asking if you want to receive Epson offers the first time you try to print when ink is low. Click Accept or Decline. To disable checking for ink offers or updates from Epson, see the instructions in your online User's Guide. 34 Maintaining Your Printer - Epson SureColor P600 | Basics and Warranty - Page 35
To check the ink cartridge status at any time, do one of the following: Control panel: 1. Press the button or tap the printer's touch screen to open the main menu. 2. Press the button. You see the Ink Levels screen. Windows: Double-click the icon in the bottom right corner of your screen (the - Epson SureColor P600 | Basics and Warranty - Page 36
.ca (Canadian sales). You can also purchase supplies from an Epson authorized reseller. To find the nearest one, call 800-GO-EPSON (800-463-7766). Use the following list when you order or purchase new ink cartridges: Ink color Photo Black Cyan Vivid Magenta Yellow Light Cyan Vivid Light Magenta - Epson SureColor P600 | Basics and Warranty - Page 37
Make sure you have a new ink cartridge before you begin. You must install new cartridges immediately after removing the old ones. 1. Open the printer cover, then open the ink cartridge cover. 2. Squeeze the tab on the cartridge and lift the cartridge straight up to remove it. Dispose of it carefully - Epson SureColor P600 | Basics and Warranty - Page 38
opening the packages or ink will leak. 4. Remove the cartridge from the package, but be careful not to touch the green chip on the cartridge. 5. Remove the yellow tape from the bottom of the cartridge. Caution: Do not remove any other labels or seals, or ink will leak. 38 Maintaining Your Printer - Epson SureColor P600 | Basics and Warranty - Page 39
into the holder and push it down until it clicks into place. 7. Close the cartridge cover, then close the printer cover. Wait for the printer to check the ink cartridges and charge the ink delivery system, if necessary. Caution: Never turn off the P600 Series while ink is charging or you'll waste - Epson SureColor P600 | Basics and Warranty - Page 40
Switching Black Ink Types Your printer comes with Matte Black and Photo Black ink cartridges. Although both must be installed for the printer to work, the printer can use only one type of ink at a time. The printer will switch ink automatically, depending on the type of media you load. This consumes - Epson SureColor P600 | Basics and Warranty - Page 41
Fiber Paper ■ Metallic Photo Paper Glossy ■ Metallic Photo Paper Luster Select the Black Ink Type Switching black ink takes several minutes. Because it consumes some of the new type of ink, you should not switch ink more often than necessary. 1. Press the button or tap the printer's touch screen to - Epson SureColor P600 | Basics and Warranty - Page 42
100 sheets or so of matte paper. 1. Turn on the printer. 2. Open the paper support and output tray. 3. Load several sheets of plain paper or , then select Paper Guide Cleaning. 6. Press Roller Cleaning to feed a sheet of paper or a cleaning sheet through the printer. 7. Feed several sheets - Epson SureColor P600 | Basics and Warranty - Page 43
the basic troubleshooting suggestions below or in your online User's Guide. Checking for Software Updates Periodically, it's a good idea to check Epson's support website for free updates to your product software. Visit the driver download site at epson.com/support (U.S.) or epson.ca/support (Canada - Epson SureColor P600 | Basics and Warranty - Page 44
paper dust builds up on the rollers, they may lose traction and become unable to feed paper properly. See page 42 or your online User's Guide for cleaning instructions. ■ If you can't insert paper easily into the manual feed tray, make sure the paper is perfectly flat and not curled. ■ Make sure the - Epson SureColor P600 | Basics and Warranty - Page 45
Epson Print CD software. See the online User's Guide for instructions. Print Quality Problems ■ For the best print quality, use Epson papers and genuine Epson ink cartridges loaded matches the paper size and paper type settings in your printer software (see page 27). ■ Remove sheets from the output - Epson SureColor P600 | Basics and Warranty - Page 46
(see below) to obtain the MAC address. Then see your router's manual for instructions. ■ If your wireless router doesn't broadcast its network name (SSID), see the online User's Guide for instructions on manually entering your wireless network name. ■ If your wireless router has security enabled - Epson SureColor P600 | Basics and Warranty - Page 47
Visit your product's support website at epson.com/support/p600 (U.S.) or epson.ca/support/p600 (Canada) for solutions to common problems. You can download drivers, printer software, and utilities, view how-to videos, access the online User's Guide, get FAQs and troubleshooting advice, or e-mail - Epson SureColor P600 | Basics and Warranty - Page 48
Notices Important Safety Instructions Before using your P600 Series, read and follow these safety instructions: ■ Be sure to follow all warnings and instructions marked on the P600 Series. ■ Use only the type of power source indicated on the P600 Series label. ■ Place the P600 Series near a wall - Epson SureColor P600 | Basics and Warranty - Page 49
only those controls that are covered by the operating instructions. ■ When storing or transporting the P600 Series, do not tilt it, stand it on its side, or turn it upside down; otherwise ink may leak from the cartridges. Ink Cartridge Safety ■ Keep ink cartridges out of the reach of children and do - Epson SureColor P600 | Basics and Warranty - Page 50
purchase. What Epson Will Do To Correct Problems: Should your Epson printer prove defective during the warranty period, please call the Epson Connection at (562) 276-7272 (U.S.) or (905) 709-2567 (Canada) for warranty repair instructions and return authorization. An Epson service technician will - Epson SureColor P600 | Basics and Warranty - Page 51
or reimbursement of materials or services required for reprinting. This warranty does not cover damage to the Epson product caused by parts or supplies not manufactured, distributed or certified by Epson. This warranty does not cover ink cartridges, ink supply units, or ink packs. This warranty does - Epson SureColor P600 | Basics and Warranty - Page 52
at: epson.com To find the Epson Customer Care Center nearest you, visit epson.com/support You can also write to: Epson America, B Personal Computers: We: Located at: Epson America, Inc. MS 3-13 3840 Kilroy Airport Way Long Beach, CA Epson Type of Product: Ink jet printer Model: B471A 52 Notices - Epson SureColor P600 | Basics and Warranty - Page 53
installation. This equipment generates, uses, and can radiate radio frequency energy and, if not installed and used in accordance with the instructions, may cause harmful interference to radio or television reception. However, there is no guarantee that interference will not occur in a particular - Epson SureColor P600 | Basics and Warranty - Page 54
- Epson SureColor P600 | Basics and Warranty - Page 55
- Epson SureColor P600 | Basics and Warranty - Page 56
-
 1
1 -
 2
2 -
 3
3 -
 4
4 -
 5
5 -
 6
6 -
 7
7 -
8
-
9
-
10
-
11
-
12
-
13
-
14
-
15
-
16
-
17
-
18
-
19
-
20
-
21
-
22
-
23
-
24
-
25
-
26
-
27
-
28
-
29
-
30
-
31
-
32
-
33
-
34
-
35
-
36
-
37
-
38
-
39
-
40
-
41
-
42
-
43
-
44
-
45
-
46
-
47
-
48
-
49
-
50
-
51
-
52
-
53
-
54
-
55
-
56
 |
 |

Epson SureColor P600 Series
Basics
®
®