Epson TM H6000 Technical Reference - Page 62
Setup, Rev.
 |
View all Epson TM H6000 manuals
Add to My Manuals
Save this manual to your list of manuals |
Page 62 highlights
4. Insert the new ribbon cassette as shown. 5. Turn the knob two or three times to make sure the ribbon is seated correctly. You can also look at the side of the slip unit to see if the ribbon is in the correct place. See below. 6. Close the front cover of the printer. 3-8 Setup Edge of ribbon cassette Rev. A
-
 1
1 -
2
-
3
-
4
-
5
-
6
-
7
-
8
-
9
-
10
-
11
-
12
-
13
-
14
-
15
-
16
-
17
-
18
-
19
-
20
-
21
-
22
-
23
-
24
-
25
-
26
-
27
-
28
-
29
-
30
-
31
-
32
-
33
-
34
-
35
-
36
-
37
-
38
-
39
-
40
-
41
-
42
-
43
-
44
-
45
-
46
-
47
-
48
-
49
-
50
-
51
-
52
-
53
-
54
-
55
-
56
-
 57
57 -
 58
58 -
 59
59 -
 60
60 -
 61
61 -
 62
62 -
 63
63 -
 64
64 -
 65
65 -
 66
66 -
 67
67 -
68
-
69
-
70
-
71
-
72
-
73
-
74
-
75
-
76
-
77
-
78
-
79
-
80
-
81
-
82
-
83
-
84
-
85
-
86
-
87
-
88
-
89
-
90
-
91
-
92
-
93
-
94
-
95
-
96
-
97
-
98
-
99
-
100
-
101
-
102
-
103
-
104
-
105
-
106
-
107
-
108
-
109
-
110
-
111
-
112
-
113
-
114
-
115
-
116
-
117
-
118
-
119
-
120
-
121
-
122
 |
 |

3-8
Setup
Rev. A
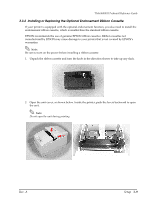
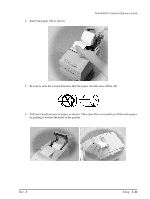
4.
Insert the new ribbon cassette as shown.
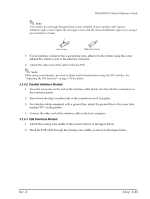
5.
Turn the knob two or three times to make sure the ribbon is seated correctly. You can also
look at the side of the slip unit to see if the ribbon is in the correct place. See below.
6.
Close the front cover of the printer.
Edge
of
ribbon
cassette