Epson TM H6000 Technical Reference - Page 64
Installing or Replacing the Paper Roll - cartridge
 |
View all Epson TM H6000 manuals
Add to My Manuals
Save this manual to your list of manuals |
Page 64 highlights
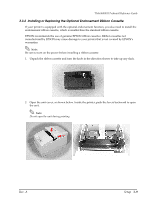
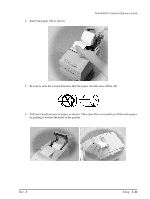
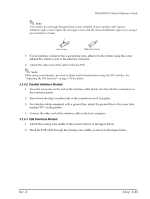
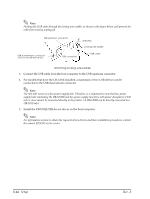
3. Insert the ribbon cartridge into the printer. You can see a properly installed ribbon in the illustration below with the arrow pointing to the knob. 4. Turn the knob two or three times to make sure that the ribbon is seated correctly. 5. Close the cover of the printer. 3.3.3 Installing or Replacing the Paper Roll Note: Do not use paper rolls that have the paper glued or taped to the core because they might cause a paper jam. To prevent paper jams, make sure that nothing obstructs paper coming out of the paper exit, and do not pull the paper out of the printer. If you would like to use roll paper which is 60mm or 58mm width, you need to adjust paper width of printer. See "Adjusting the Roll Paper Width" on page 3-17 for details. 1. To prevent data loss make sure that the printer is not receiving data. 2. Open the paper roll cover by lifting up the two tabs on the paper roll cover and then pushing the cover back. 3. Remove the used paper roll core if there is one. 3-10 Setup Rev. A
-
 1
1 -
2
-
3
-
4
-
5
-
6
-
7
-
8
-
9
-
10
-
11
-
12
-
13
-
14
-
15
-
16
-
17
-
18
-
19
-
20
-
21
-
22
-
23
-
24
-
25
-
26
-
27
-
28
-
29
-
30
-
31
-
32
-
33
-
34
-
35
-
36
-
37
-
38
-
39
-
40
-
41
-
42
-
43
-
44
-
45
-
46
-
47
-
48
-
49
-
50
-
51
-
52
-
53
-
54
-
55
-
56
-
57
-
58
-
 59
59 -
 60
60 -
 61
61 -
 62
62 -
 63
63 -
 64
64 -
 65
65 -
 66
66 -
 67
67 -
 68
68 -
 69
69 -
70
-
71
-
72
-
73
-
74
-
75
-
76
-
77
-
78
-
79
-
80
-
81
-
82
-
83
-
84
-
85
-
86
-
87
-
88
-
89
-
90
-
91
-
92
-
93
-
94
-
95
-
96
-
97
-
98
-
99
-
100
-
101
-
102
-
103
-
104
-
105
-
106
-
107
-
108
-
109
-
110
-
111
-
112
-
113
-
114
-
115
-
116
-
117
-
118
-
119
-
120
-
121
-
122
 |
 |
