Epson TM H6000 Technical Reference - Page 72
Adjusting the Roll Paper Near End Detector - s manual
 |
View all Epson TM H6000 manuals
Add to My Manuals
Save this manual to your list of manuals |
Page 72 highlights
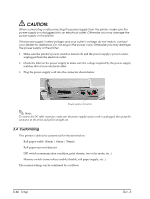
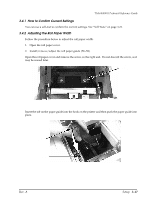
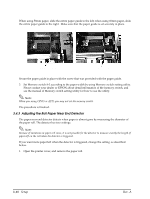
When using 58mm paper, slide the entire paper guide to the left; when using 60mm paper, slide the entire paper guide to the right. Make sure that the paper guide is set securely in place. 58 mm setup position 60 mm setup position Secure the paper guide in place with the screw that was provided with the paper guide. 3. Set Memory switch 8-3 according to the paper width by using Memory switch setting utility. Please contact your dealer or EPSON about detail information of the memory switch, and see the manual of Memory switch setting utility for how to use the utility. Note: When you using OPOS or APD, you may not set the memory switch. The procedure is finished. 3.4.3 Adjusting the Roll Paper Near End Detector The paper near end detector detects when paper is almost gone by measuring the diameter of the paper roll. The detector has two settings. Note: Because of variations in paper roll cores, it is not possible for the detector to measure exactly the length of paper left on the roll when the detector is triggered. If you want more paper left when the detector is triggered, change the setting, as described below. 1. Open the printer cover, and remove the paper roll. 3-18 Setup Rev. A
-
 1
1 -
2
-
3
-
4
-
5
-
6
-
7
-
8
-
9
-
10
-
11
-
12
-
13
-
14
-
15
-
16
-
17
-
18
-
19
-
20
-
21
-
22
-
23
-
24
-
25
-
26
-
27
-
28
-
29
-
30
-
31
-
32
-
33
-
34
-
35
-
36
-
37
-
38
-
39
-
40
-
41
-
42
-
43
-
44
-
45
-
46
-
47
-
48
-
49
-
50
-
51
-
52
-
53
-
54
-
55
-
56
-
57
-
58
-
59
-
60
-
61
-
62
-
63
-
64
-
65
-
66
-
 67
67 -
 68
68 -
 69
69 -
 70
70 -
 71
71 -
 72
72 -
 73
73 -
 74
74 -
 75
75 -
 76
76 -
 77
77 -
78
-
79
-
80
-
81
-
82
-
83
-
84
-
85
-
86
-
87
-
88
-
89
-
90
-
91
-
92
-
93
-
94
-
95
-
96
-
97
-
98
-
99
-
100
-
101
-
102
-
103
-
104
-
105
-
106
-
107
-
108
-
109
-
110
-
111
-
112
-
113
-
114
-
115
-
116
-
117
-
118
-
119
-
120
-
121
-
122
 |
 |
