Fujitsu S510 Operator's Guide - Page 76
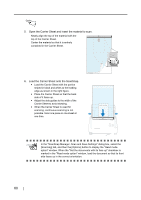
Open the Carrier Sheet and insert the document., Load the Carrier Sheet onto the ScanSnap.
 |
UPC - 097564307218
View all Fujitsu S510 manuals
Add to My Manuals
Save this manual to your list of manuals |
Page 76 highlights
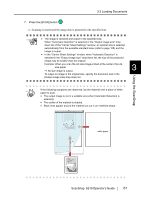
7. Open the Carrier Sheet and insert the document. Align the fold with the right edge of the Carrier Sheet so that the document fits into the Carrier Sheet at the upper corner. 8. Load the Carrier Sheet onto the ScanSnap. • Load the Carrier Sheet with the portion striped in black and white as the leading edge as shown in the right figure. • Adjust the side guides to the width of the Carrier Sheet to avoid skewing. • When the Carrier Sheet is used for scanning, continuous scanning is not possible. Scan one piece or one sheet at one time. SCAN POWER 9. Press the [SCAN] button . ⇒ The front and back side images are merged into a double-page spread image. 56
-
 1
1 -
2
-
3
-
4
-
5
-
6
-
7
-
8
-
9
-
10
-
11
-
12
-
13
-
14
-
15
-
16
-
17
-
18
-
19
-
20
-
21
-
22
-
23
-
24
-
25
-
26
-
27
-
28
-
29
-
30
-
31
-
32
-
33
-
34
-
35
-
36
-
37
-
38
-
39
-
40
-
41
-
42
-
43
-
44
-
45
-
46
-
47
-
48
-
49
-
50
-
51
-
52
-
53
-
54
-
55
-
56
-
57
-
58
-
59
-
60
-
61
-
62
-
63
-
64
-
65
-
66
-
67
-
68
-
69
-
70
-
 71
71 -
 72
72 -
 73
73 -
 74
74 -
 75
75 -
 76
76 -
 77
77 -
 78
78 -
 79
79 -
 80
80 -
 81
81 -
82
-
83
-
84
-
85
-
86
-
87
-
88
-
89
-
90
-
91
-
92
-
93
-
94
-
95
-
96
-
97
-
98
-
99
-
100
-
101
-
102
-
103
-
104
-
105
-
106
-
107
-
108
-
109
-
110
-
111
-
112
-
113
-
114
-
115
-
116
-
117
-
118
-
119
-
120
-
121
-
122
-
123
-
124
-
125
-
126
-
127
-
128
-
129
-
130
-
131
-
132
-
133
-
134
-
135
-
136
-
137
-
138
-
139
-
140
-
141
-
142
-
143
-
144
-
145
-
146
-
147
-
148
-
149
-
150
-
151
-
152
-
153
-
154
-
155
-
156
-
157
-
158
-
159
-
160
-
161
-
162
-
163
-
164
-
165
-
166
-
167
-
168
-
169
-
170
-
171
-
172
-
173
-
174
-
175
-
176
-
177
-
178
-
179
-
180
-
181
-
182
-
183
-
184
-
185
-
186
-
187
-
188
-
189
-
190
-
191
-
192
-
193
-
194
-
195
-
196
-
197
-
198
-
199
-
200
-
201
-
202
-
203
-
204
-
205
-
206
-
207
-
208
-
209
-
210
-
211
-
212
-
213
-
214
-
215
-
216
-
217
-
218
-
219
-
220
-
221
-
222
-
223
-
224
-
225
-
226
-
227
-
228
-
229
-
230
-
231
-
232
-
233
-
234
-
235
-
236
-
237
-
238
-
239
-
240
-
241
-
242
-
243
-
244
-
245
-
246
-
247
-
248
-
249
-
250
-
251
-
252
-
253
-
254
-
255
-
256
-
257
-
258
-
259
-
260
-
261
-
262
-
263
-
264
-
265
-
266
-
267
-
268
-
269
-
270
-
271
-
272
-
273
-
274
-
275
-
276
-
277
-
278
-
279
-
280
-
281
-
282
-
283
-
284
-
285
-
286
-
287
 |
 |

56
7.
Open the Carrier Sheet and insert the document.
8.
Load the Carrier Sheet onto the ScanSnap.
9.
Press the [SCAN] button
.
⇒
The front and back side images are merged into a double-page spread image.
Align the fold with the right edge of the
Carrier Sheet so that the document fits into
the Carrier Sheet at the upper corner.
•
Load the Carrier Sheet with the portion
striped in black and white as the leading
edge as shown in the right figure.
•
Adjust the side guides to the width of the
Carrier Sheet to avoid skewing.
•
When the Carrier Sheet is used for
scanning, continuous scanning is not
possible. Scan one piece or one sheet at
one time.
SCAN
POWER