Ganz Security NR8HL-2TB NR4HLNR8HL User Manual - Page 30
Display Setting
 |
View all Ganz Security NR8HL-2TB manuals
Add to My Manuals
Save this manual to your list of manuals |
Page 30 highlights
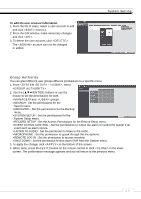
System Setting Display Setting You can configure the display settings regarding the OSD menus, monitor and sequence. OSD Configure the settings for the time, title, boundary, icon and language that will be displayed on the screen. 1. From - , select . 2. Use the [ʆʈُٙ/ENTER] buttons on the remote control or use the mouse to set each option of the OSD item. > CAMERA TITLE : specify the display of the camera title on the screen. > RECORDING MODE ICON : specify the display of the record mode icon on the screen. > AUDIO ICON : specify the display of the audio icon on the screen. > STATUS BAR ON FULL SCREEN MODE : select to show or hide the status bar in full screen mode. - AUTO HIDE : place the cursor in the lower area of the screen to display the status bar. If moving the cursor up, the status bar will disappear. - ALWAYS ON : The status bar will be displayed at all times. - 5 SEC ~1 MIN : If no mouse movement is detected for from 5 seconds to 1 minute, the status bar will disappear. > TIMELINE ON FULL SCREEN MODE : select to show or hide the timeline in full screen mode. - AUTO HIDE : place the cursor in the right corner to display the timeline. If moving the cursor to the left, the timeline will disappear. - ALWAYS ON : The timeline will be displayed at all times. - ALWAYS OFF : The timeline will not be displayed. > BORDER LINE : specify the display of the cross-border between channels in a split mode > BORDER COLOR : select a color for the border. > USER NAME : specify the display of the currently logged-in users on the status bar. > LANGUAGE : select a menu display language. 3. To apply the change, click in the bottom of the screen. 4. When done, press the [EXIT] button on the remote control or click in the lower screen. The confirmation message appears and you will return to the previous menu. ᧯᧬
-
 1
1 -
2
-
3
-
4
-
5
-
6
-
7
-
8
-
9
-
10
-
11
-
12
-
13
-
14
-
15
-
16
-
17
-
18
-
19
-
20
-
21
-
22
-
23
-
24
-
 25
25 -
 26
26 -
 27
27 -
 28
28 -
 29
29 -
 30
30 -
 31
31 -
 32
32 -
 33
33 -
 34
34 -
 35
35 -
36
-
37
-
38
-
39
-
40
-
41
-
42
-
43
-
44
-
45
-
46
-
47
-
48
-
49
-
50
-
51
-
52
-
53
-
54
-
55
-
56
-
57
-
58
-
59
-
60
-
61
-
62
-
63
-
64
-
65
-
66
-
67
-
68
-
69
-
70
-
71
-
72
-
73
-
74
-
75
-
76
-
77
-
78
-
79
-
80
-
81
-
82
-
83
-
84
-
85
-
86
-
87
-
88
-
89
-
90
-
91
-
92
-
93
-
94
-
95
-
96
-
97
-
98
-
99
-
100
-
101
-
102
-
103
-
104
-
105
-
106
 |
 |
