Ganz Security NR8HL-2TB NR4HLNR8HL User Manual - Page 32
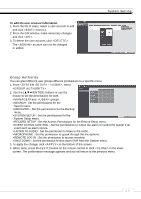
To edit a sequence
 |
View all Ganz Security NR8HL-2TB manuals
Add to My Manuals
Save this manual to your list of manuals |
Page 32 highlights
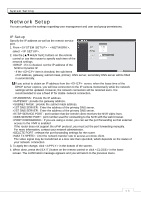
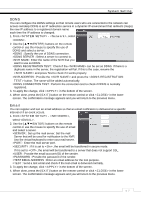
System Setting 6. If the selected split mode is CONFIRMATION displayed on , select a channel you want to display in each split screen. 7. Click . The set sequence mode is confirmed and will be added to the Add Sequence list in order 8. When done, click in the bottom of the screen. After the sequence type is saved, you will return to the previous screen. 9. Right-click on the new sequence, or press the [ENTER] button on the remote control to edit or delete it. To edit a sequence 1. Select a sequence that you want to edit in the list. 2. The "EDIT" dialog appears. 3. Use the [ʆʈُٙ/ENTER] buttons on the remote control or use the mouse to edit the selected sequence. >SEQUENCE TITLE : enter a new sequence name. >ACTIVATION : specify the use of the sequence. >MODIFY : change the settings of the sequence mode. >DELETE : delete the selected sequence list. >CANCEL : cancel the changes. 4. Pressing the button will display the Edit Sequence window. 5. To change the existing settings, select a screen mode that you want to edit and right-click to display the context menu. Then, select . 6. When done, click to close the window. 7. To apply your changes, click . ᧯᧮
-
 1
1 -
2
-
3
-
4
-
5
-
6
-
7
-
8
-
9
-
10
-
11
-
12
-
13
-
14
-
15
-
16
-
17
-
18
-
19
-
20
-
21
-
22
-
23
-
24
-
25
-
26
-
 27
27 -
 28
28 -
 29
29 -
 30
30 -
 31
31 -
 32
32 -
 33
33 -
 34
34 -
 35
35 -
 36
36 -
 37
37 -
38
-
39
-
40
-
41
-
42
-
43
-
44
-
45
-
46
-
47
-
48
-
49
-
50
-
51
-
52
-
53
-
54
-
55
-
56
-
57
-
58
-
59
-
60
-
61
-
62
-
63
-
64
-
65
-
66
-
67
-
68
-
69
-
70
-
71
-
72
-
73
-
74
-
75
-
76
-
77
-
78
-
79
-
80
-
81
-
82
-
83
-
84
-
85
-
86
-
87
-
88
-
89
-
90
-
91
-
92
-
93
-
94
-
95
-
96
-
97
-
98
-
99
-
100
-
101
-
102
-
103
-
104
-
105
-
106
 |
 |
