Ganz Security NR8HL-2TB NR4HLNR8HL User Manual - Page 45
Event Setup
 |
View all Ganz Security NR8HL-2TB manuals
Add to My Manuals
Save this manual to your list of manuals |
Page 45 highlights
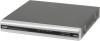
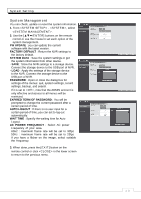
System Setting 9 S.M.A.R.T CHECK INTERVAL : Specify the S.M.A.R.T check interval. Click to start checking. 3. To apply the change, click in the bottom of the screen. 4. When done, press the [EXIT] button on the remote control or click in the lower screen. The confirmation message appears and you will return to the previous menu. Event Setup Define various events, and specify the conditions to notify the user in various ways. Alarm Out Specify the alarm output conditions with the work schedule. Alarm Out 1. From - , select . 2. Use the [ʆʈُٙ/ENTER] buttons on the remote control or use the mouse to select and configure the related settings. >NAME : You can rename the alarm. >OPERATION : Set the alarm output mode. - N/O (Normal Open) : It normally stays Open. However, if an event occurs, it will switch to Close. - N/O (Normal Close) : It normally stays Close. However, if an event occurs, it will switch to Open. >DURATION : Specify the duration of the alarm output. - TRANSPARENT : Keep the alarm out for as much time as the event lasts. - UNTIL KEY : Keep the alarm out until a mouse or remote control button is pressed. - 5 ~ 300 SEC : Keep the alarm out for as long as specified. >TEST : Forcibly output the alarm for the test purpose. 3. To apply the change, click in the bottom of the screen. 4. When done, press the [EXIT] button on the remote control or click in the lower screen. The confirmation message appears and you will return to the previous menu. ᧰᧱
-
 1
1 -
2
-
3
-
4
-
5
-
6
-
7
-
8
-
9
-
10
-
11
-
12
-
13
-
14
-
15
-
16
-
17
-
18
-
19
-
20
-
21
-
22
-
23
-
24
-
25
-
26
-
27
-
28
-
29
-
30
-
31
-
32
-
33
-
34
-
35
-
36
-
37
-
38
-
39
-
 40
40 -
 41
41 -
 42
42 -
 43
43 -
 44
44 -
 45
45 -
 46
46 -
 47
47 -
 48
48 -
 49
49 -
 50
50 -
51
-
52
-
53
-
54
-
55
-
56
-
57
-
58
-
59
-
60
-
61
-
62
-
63
-
64
-
65
-
66
-
67
-
68
-
69
-
70
-
71
-
72
-
73
-
74
-
75
-
76
-
77
-
78
-
79
-
80
-
81
-
82
-
83
-
84
-
85
-
86
-
87
-
88
-
89
-
90
-
91
-
92
-
93
-
94
-
95
-
96
-
97
-
98
-
99
-
100
-
101
-
102
-
103
-
104
-
105
-
106
 |
 |
