Garmin GPSMAP 178C Owners Manual - Page 20
Marking Waypoints, To mark your present position - manuale
 |
UPC - 753759043544
View all Garmin GPSMAP 178C manuals
Add to My Manuals
Save this manual to your list of manuals |
Page 20 highlights
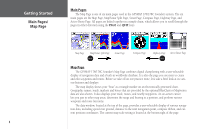
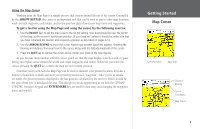
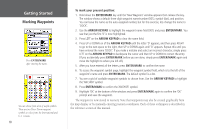
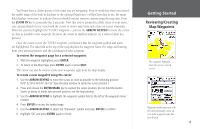
Getting Started Marking Waypoints Press ENTER/MARK after entering the name. You can choose from a list of useful symbols. There are two Diver Down waypoint symbols to select from: the International and U.S. versions. 10 To mark your present position: 1. Hold down the ENTER/MARK key until the 'New Waypoint' window appears then release the key. The window shows a default three-digit waypoint name/number (001), symbol (dot), and position. You can leave the name as the auto-assigned number, but for this exercise, lets change the name to 'DOCK'. 2. Use the ARROW KEYPAD to highlight the waypoint name field (001) and press ENTER/MARK. You see that just the first '0' is now highlighted. 3. Press LEFT on the ARROW KEYPAD to clear the name field. 4. Press UP or DOWN on of the ARROW KEYPAD until the letter 'D' appears, and then press RIGHT to go to the next space to the right, then UP or DOWN again until 'O' appears. Repeat this until you have entered the name 'DOCK'. If you make a mistake and select an incorrect character, simply press LEFT on the ARROW KEYPAD to backspace the cursor and then UP or DOWN to correct the entry. (If you accidentally press ENTER/MARK before you are done, simply press ENTER/MARK again and move the highlight to where you left off.) 5. After you have entered all the letters, press ENTER/MARK to confirm the name. 6. To access the waypoint symbol page, highlight the waypoint symbol field, which is to the left of the waypoint's name and press ENTER/MARK. The default symbol is a dot. 7. You see a grid of available waypoint symbols to choose from. Use the ARROW KEYPAD to highlight the 'ANCHOR' symbol. 8. Press ENTER/MARK to confirm the 'ANCHOR' symbol. 9. Highlight 'OK' at the bottom of the window and press ENTER/MARK again to confirm the 'OK' prompt and save the waypoint. The waypoint is now stored in memory. Note that waypoints may also be created graphically from the map display or by manually entering position coordinates. Each of these techniques is described in the reference section of this manual.
-
 1
1 -
2
-
3
-
4
-
5
-
6
-
7
-
8
-
9
-
10
-
11
-
12
-
13
-
14
-
 15
15 -
 16
16 -
 17
17 -
 18
18 -
 19
19 -
 20
20 -
 21
21 -
 22
22 -
 23
23 -
 24
24 -
 25
25 -
26
-
27
-
28
-
29
-
30
-
31
-
32
-
33
-
34
-
35
-
36
-
37
-
38
-
39
-
40
-
41
-
42
-
43
-
44
-
45
-
46
-
47
-
48
-
49
-
50
-
51
-
52
-
53
-
54
-
55
-
56
-
57
-
58
-
59
-
60
-
61
-
62
-
63
-
64
-
65
-
66
-
67
-
68
-
69
-
70
-
71
-
72
-
73
-
74
-
75
-
76
-
77
-
78
-
79
-
80
-
81
-
82
-
83
-
84
-
85
-
86
-
87
-
88
-
89
-
90
-
91
-
92
-
93
-
94
-
95
-
96
-
97
-
98
-
99
-
100
-
101
-
102
-
103
-
104
-
105
-
106
-
107
-
108
-
109
-
110
-
111
-
112
-
113
-
114
-
115
-
116
-
117
-
118
-
119
-
120
-
121
-
122
-
123
-
124
-
125
-
126
-
127
-
128
-
129
-
130
-
131
-
132
-
133
-
134
 |
 |
