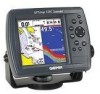
Garmin GPSMAP 178C Owners Manual - Page 25
Sonar Level, Whiteline, Frequency, Depth Line, Noise Reject
 |
UPC - 753759043544
View all Garmin GPSMAP 178C manuals
Add to My Manuals
Save this manual to your list of manuals |
Page 25 highlights
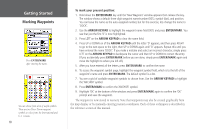
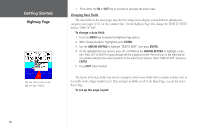
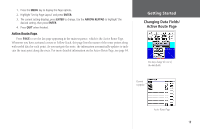
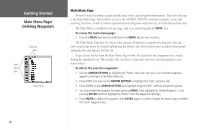
Using the Adjustment Menu The Adjustment Menu allows direct access to the settings and features most commonly used on the Sonar Page. There are 10 main adjustment options available: Range, Zoom, View/Span, Gain, Target Level, Whiteline, Frequency, Depth Line, Noise Reject, and Scroll. The currently selected option appears in the upper left of the display with up and down arrows on either side of the option name. To select an adjustment option from the Sonar Page: 1. Press the ARROW KEYPAD LEFT/RIGHT to scroll through the options in the upper left of the display, then press ENTER to access the desired option's adjustment window. OR: 1. Press MENU, highlight 'Adjustments' and press ENTER. A list of all options and their current settings appears, with the selected option highlighted. Press UP/DOWN on the ARROW KEYPAD to select the desired option and press ENTER to access the adjustment window. To easily exit any of the adjustment options, press the QUIT key. To change an Adjustment Menu setting: 1. Select an adjustment option to change using one of the two methods described above. The adjust- ment window automatically times out and disappear when idle for 20 seconds. 2. Press the ARROW KEYPAD UP/DOWN to place the pointer or setting bar at the desired setting, range or percentage (Off, 1-100%). 3. Press ENTER or QUIT to exit the adjustment window; or press LEFT/RIGHT on the ARROW KEYPAD to view another adjustment window. To change a setting back to 'Normal' or 'Auto': 1. On the adjustment window for the desired option, press MENU. 2. Select the desired setting and press ENTER. For detailed information on the functions and options of the Sonar Page, see page 33. To learn more about how sonar works, see Appendix G. Getting Started Sonar Page Press MENU, highlight 'Adjustments' and press ENTER to see a list of all options and their current settings. Zoom adjustment options 15
-
 1
1 -
2
-
3
-
4
-
5
-
6
-
7
-
8
-
9
-
10
-
11
-
12
-
13
-
14
-
15
-
16
-
17
-
18
-
19
-
 20
20 -
 21
21 -
 22
22 -
 23
23 -
 24
24 -
 25
25 -
 26
26 -
 27
27 -
 28
28 -
 29
29 -
 30
30 -
31
-
32
-
33
-
34
-
35
-
36
-
37
-
38
-
39
-
40
-
41
-
42
-
43
-
44
-
45
-
46
-
47
-
48
-
49
-
50
-
51
-
52
-
53
-
54
-
55
-
56
-
57
-
58
-
59
-
60
-
61
-
62
-
63
-
64
-
65
-
66
-
67
-
68
-
69
-
70
-
71
-
72
-
73
-
74
-
75
-
76
-
77
-
78
-
79
-
80
-
81
-
82
-
83
-
84
-
85
-
86
-
87
-
88
-
89
-
90
-
91
-
92
-
93
-
94
-
95
-
96
-
97
-
98
-
99
-
100
-
101
-
102
-
103
-
104
-
105
-
106
-
107
-
108
-
109
-
110
-
111
-
112
-
113
-
114
-
115
-
116
-
117
-
118
-
119
-
120
-
121
-
122
-
123
-
124
-
125
-
126
-
127
-
128
-
129
-
130
-
131
-
132
-
133
-
134
 |
 |
