Garmin GPSMAP 178C Owners Manual - Page 56
Additional Options For Creating Waypoints, To create a new waypoint by entering location coordinates
 |
UPC - 753759043544
View all Garmin GPSMAP 178C manuals
Add to My Manuals
Save this manual to your list of manuals |
Page 56 highlights
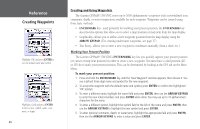
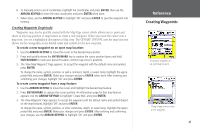
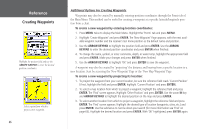
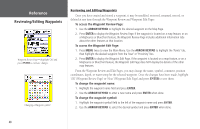
Reference Creating Waypoints Highlight the position field and use the ARROW KEYPAD to enter the desired position coordinates. Select a point from which to project a new waypoint. 46 Additional Options For Creating Waypoints Waypoints may also be created by manually entering position coordinates through the Points tab of the Main Menu. This method can be useful for creating a waypoint at a specific latitude/longitude position from a chart. To create a new waypoint by entering location coordinates: 1. Press MENU twice to display the Main Menu. Highlight the 'Points' tab and press MENU. 2. Highlight 'Create Waypoint' and press ENTER. The 'New Waypoint' Page appears, with the next available waypoint number and the receiver's last know position as the default name and position. 3. Use the ARROW KEYPAD to highlight the position field and press ENTER. Use the ARROW KEYPAD to enter the desired position coordinates and press ENTER when finished. 4. To change the name, symbol, or enter comments, depth, or water temp, highlight the appropriate field and press ENTER. Make your changes and press ENTER when finished. 5. Use the ARROW KEYPAD to highlight 'OK' and press ENTER to save the waypoint. A waypoint may also be created by "projecting" the distance and bearing from a specific location to a new location. Start by accessing the 'New Waypoint' Page or the 'New Map Waypoint' Page. To create a new waypoint by projecting its location: 1. To project the waypoint from your current location, be sure the reference field reads 'Current Position' (if not, highlight the field and press ENTER, highlight 'Current Position' and press ENTER). 2. To select a map location from which to project a waypoint, highlight the reference field and press ENTER. The 'Find' screen appears. Highlight 'Other Position' and press ENTER. Use the zoom IN key and ARROW KEYPAD to highlight the desired position on the map and press ENTER. 3. To select another location from which to project a waypoint, highlight the reference field and press ENTER. The 'Find' screen appears. Highlight the desired type of location (waypoints, cities, etc.) and press ENTER. Use the submenus to narrow down your search (for more information see 'Find' on page 65). Highlight the desired location and press ENTER. With 'OK' highlighted, press ENTER again.
-
 1
1 -
2
-
3
-
4
-
5
-
6
-
7
-
8
-
9
-
10
-
11
-
12
-
13
-
14
-
15
-
16
-
17
-
18
-
19
-
20
-
21
-
22
-
23
-
24
-
25
-
26
-
27
-
28
-
29
-
30
-
31
-
32
-
33
-
34
-
35
-
36
-
37
-
38
-
39
-
40
-
41
-
42
-
43
-
44
-
45
-
46
-
47
-
48
-
49
-
50
-
 51
51 -
 52
52 -
 53
53 -
 54
54 -
 55
55 -
 56
56 -
 57
57 -
 58
58 -
 59
59 -
 60
60 -
 61
61 -
62
-
63
-
64
-
65
-
66
-
67
-
68
-
69
-
70
-
71
-
72
-
73
-
74
-
75
-
76
-
77
-
78
-
79
-
80
-
81
-
82
-
83
-
84
-
85
-
86
-
87
-
88
-
89
-
90
-
91
-
92
-
93
-
94
-
95
-
96
-
97
-
98
-
99
-
100
-
101
-
102
-
103
-
104
-
105
-
106
-
107
-
108
-
109
-
110
-
111
-
112
-
113
-
114
-
115
-
116
-
117
-
118
-
119
-
120
-
121
-
122
-
123
-
124
-
125
-
126
-
127
-
128
-
129
-
130
-
131
-
132
-
133
-
134
 |
 |
