Garmin tactix Bravo Owner s Manual PDF - Page 6
Entering Wind Information for a Static Jump
 |
View all Garmin tactix Bravo manuals
Add to My Manuals
Save this manual to your list of manuals |
Page 6 highlights
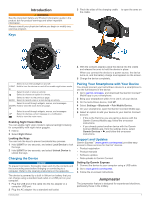
The jumpmaster feature follows military guidelines for calculating the high altitude release point (HARP). The device detects automatically when you have jumped to begin navigating toward the desired impact point (DIP) using the barometer and electronic compass. Planning a Jump WARNING Jumpmaster is for use by experienced skydivers only. Jumpmaster should not be used as a primary skydiving altimeter. Failure to input the appropriate jump related information into Jumpmaster can lead to serious personal injury or death. 1 Select a jump type (Jump Types, page 2). 2 Enter the jump information (Entering Jump Information, page 2). The device calculates the HARP. 3 Select GO TO HARP to start navigation to the HARP. Jump Types The jumpmaster feature allows you to set the jump type to one of three types: HAHO, HALO, or Static. The jump type selected determines what additional setup information is required (Entering Jump Information, page 2). For all jump types, drop altitudes and opening altitudes are measured in feet above ground level (AGL). HAHO: High Altitude High Opening. The jumpmaster jumps from a very high altitude and opens the parachute at a high altitude. You must set a DIP and a drop altitude of at least 1,000 feet. The drop altitude is assumed to be the same as the opening altitude. Common values for a drop altitude range from 12,000 to 24,000 feet AGL. HALO: High Altitude Low Opening. The jumpmaster jumps from a very high altitude and opens the parachute at a low altitude. The required information is the same as the HAHO jump type, plus an opening altitude. The opening altitude must not be greater than the drop altitude. Common values for an opening altitude range from 2,000 to 6,000 feet AGL. Static: The wind speed and direction are assumed to be constant for the duration of the jump. The drop altitude must be at least 1,000 feet. Entering Jump Information 1 Select . 2 Select Jumpmaster. 3 Select a jump type (Jump Types, page 2). 4 Complete one or more actions to enter your jump information: • Select DIP to set a waypoint for the desired landing location. • Select Drop Alt. to set the drop altitude AGL (in feet) when the jumpmaster exits the aircraft. • Select Open Alt to set the open altitude AGL (in feet) when the jumpmaster opens the parachute. • Select Forward Throw to set the horizontal distance traveled (in meters) due to aircraft speed. • Select Crs. to HARP to set the direction traveled (in degrees) due to aircraft speed. • Select Wind to set the wind speed (in knots) and direction (in degrees). • Select Constant to fine-tune some information for the planned jump. Depending on the jump type, you can select Percent Max., Safety Factor, K-Open, K-Freefall, or K-Static and enter additional information (Constant Settings, page 2). • Select Auto to DIP to enable navigation to the DIP automatically after you jump. • Select GO TO HARP to start navigation to the HARP. Entering Wind Information for HAHO and HALO Jumps 1 Select . 2 Select Jumpmaster. 3 Select a jump type (Jump Types, page 2). 4 Select Wind > Add. 5 Select an altitude. 6 Enter a wind speed in knots and select Done. 7 Enter a wind direction in degrees and select Done. The wind value is added to the list. Only wind values included in the list are used in calculations. 8 Repeat steps 5-7 for each available altitude. Resetting Wind Information 1 Select . 2 Select Jumpmaster. 3 Select HAHO or HALO. 4 Select Wind > Reset. All wind values are removed from the list. Entering Wind Information for a Static Jump 1 Select . 2 Select Jumpmaster > Static > Wind. 3 Enter a wind speed in knots and select Done. 4 Enter a wind direction in degrees and select Done. Constant Settings Select Jumpmaster, select a jump type, and select Constant. Percent Max.: Sets the jump range for all jump types. A setting less than 100% decreases the drift distance to the DIP, and a setting greater than 100% increases the drift distance. More experienced jumpmasters may want to use smaller numbers, and less experienced skydivers may want to use larger numbers. Safety Factor: Sets the margin of error for a jump (HAHO only). Safety factors are usually integer values of two or greater, and are determined by the jumpmaster based on specifications for the jump. K-Freefall: Sets the wind drag value for a parachute during freefall, based on the parachute canopy rating (HALO only). Each parachute should be labeled with a K value. K-Open: Sets the wind drag value for an open parachute, based on the parachute canopy rating (HAHO and HALO). Each parachute should be labeled with a K value. K-Static: Sets the wind drag value for a parachute during a static jump, based on the parachute canopy rating (Static only). Each parachute should be labeled with a K value. Activities Your device can be used for indoor, outdoor, athletic, and fitness activities. When you start an activity, the device displays and records sensor data. You can save activities and share them with the Garmin Connect community. You can also add Connect IQ™ activity apps to your device using your Garmin Connect account (Connect IQ Features, page 13). 2 Activities
-
 1
1 -
 2
2 -
 3
3 -
 4
4 -
 5
5 -
 6
6 -
 7
7 -
 8
8 -
 9
9 -
 10
10 -
 11
11 -
 12
12 -
13
-
14
-
15
-
16
-
17
-
18
-
19
-
20
-
21
-
22
-
23
-
24
-
25
-
26
-
27
-
28
-
29
-
30
-
31
-
32
-
33
-
34
 |
 |
