HTC P3470 User Manual - Page 149
Set up Windows Live™, Start > Programs > Windows Live
 |
View all HTC P3470 manuals
Add to My Manuals
Save this manual to your list of manuals |
Page 149 highlights
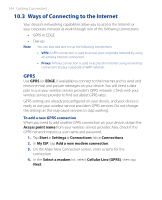
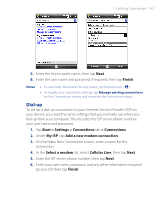
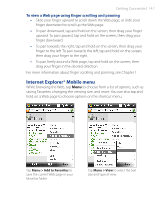
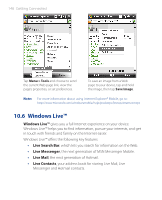
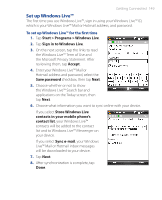
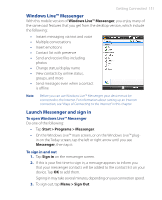
Getting Connected 149 Set up Windows Live™ The first time you use Windows Live™, sign in using your Windows Live™ ID, which is your Windows Live™ Mail or Hotmail address, and password. To set up Windows Live™ for the first time 1. Tap Start > Programs > Windows Live. 2. Tap Sign in to Windows Live. 3. On the next screen, tap the links to read the Windows Live™ Term of Use and the Microsoft Privacy Statement. After reviewing them, tap Accept. 4. Enter your Windows Live™ Mail or Hotmail address and password, select the Save password checkbox, then tap Next. 5. Choose whether or not to show the Windows Live™ Search bar and applications on the Today screen, then tap Next. 6. Choose what information you want to sync online with your device. If you select Store Windows Live contacts in your mobile phone's contact list, your Windows Live™ contacts will be added to the contact list and to Windows Live™ Messenger on your device. If you select Sync e-mail, your Windows Live™ Mail or Hotmail inbox messages will be downloaded to your device. 7. Tap Next. 8. After synchronization is complete, tap Done.
-
 1
1 -
2
-
3
-
4
-
5
-
6
-
7
-
8
-
9
-
10
-
11
-
12
-
13
-
14
-
15
-
16
-
17
-
18
-
19
-
20
-
21
-
22
-
23
-
24
-
25
-
26
-
27
-
28
-
29
-
30
-
31
-
32
-
33
-
34
-
35
-
36
-
37
-
38
-
39
-
40
-
41
-
42
-
43
-
44
-
45
-
46
-
47
-
48
-
49
-
50
-
51
-
52
-
53
-
54
-
55
-
56
-
57
-
58
-
59
-
60
-
61
-
62
-
63
-
64
-
65
-
66
-
67
-
68
-
69
-
70
-
71
-
72
-
73
-
74
-
75
-
76
-
77
-
78
-
79
-
80
-
81
-
82
-
83
-
84
-
85
-
86
-
87
-
88
-
89
-
90
-
91
-
92
-
93
-
94
-
95
-
96
-
97
-
98
-
99
-
100
-
101
-
102
-
103
-
104
-
105
-
106
-
107
-
108
-
109
-
110
-
111
-
112
-
113
-
114
-
115
-
116
-
117
-
118
-
119
-
120
-
121
-
122
-
123
-
124
-
125
-
126
-
127
-
128
-
129
-
130
-
131
-
132
-
133
-
134
-
135
-
136
-
137
-
138
-
139
-
140
-
141
-
142
-
143
-
 144
144 -
 145
145 -
 146
146 -
 147
147 -
 148
148 -
 149
149 -
 150
150 -
 151
151 -
 152
152 -
 153
153 -
 154
154 -
155
-
156
-
157
-
158
-
159
-
160
-
161
-
162
-
163
-
164
-
165
-
166
-
167
-
168
-
169
-
170
-
171
-
172
-
173
-
174
-
175
-
176
-
177
-
178
-
179
-
180
-
181
-
182
-
183
-
184
-
185
-
186
-
187
-
188
-
189
-
190
-
191
-
192
-
193
-
194
-
195
-
196
-
197
-
198
-
199
-
200
-
201
-
202
-
203
-
204
-
205
-
206
-
207
-
208
-
209
-
210
-
211
-
212
-
213
-
214
-
215
-
216
-
217
-
218
-
219
-
220
-
221
-
222
-
223
-
224
-
225
-
226
-
227
-
228
-
229
-
230
-
231
-
232
-
233
-
234
-
235
-
236
-
237
-
238
-
239
-
240
-
241
-
242
 |
 |