HP 625 Compaq 325 and 326 Notebook PCs HP 425 and 625 Notebook PCs - Maintenan - Page 110
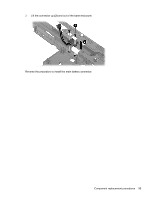
Lift the audio board, from the base enclosure.
 |
View all HP 625 manuals
Add to My Manuals
Save this manual to your list of manuals |
Page 110 highlights
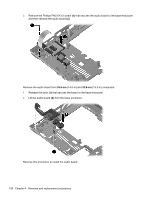
2. Remove the Phillips PM2.0×3.0 screw (1) that secures the audio board to the base enclosure and then remove the audio board (2). Remove the audio board from 35.6-cm (14.0-in) and 33.8-cm (13.3-in) computers: 1. Release the latch (1) that secures the board to the base enclosure. 2. Lift the audio board (2) from the base enclosure. Reverse this procedure to install the audio board. 100 Chapter 4 Removal and replacement procedures
-
 1
1 -
2
-
3
-
4
-
5
-
6
-
7
-
8
-
9
-
10
-
11
-
12
-
13
-
14
-
15
-
16
-
17
-
18
-
19
-
20
-
21
-
22
-
23
-
24
-
25
-
26
-
27
-
28
-
29
-
30
-
31
-
32
-
33
-
34
-
35
-
36
-
37
-
38
-
39
-
40
-
41
-
42
-
43
-
44
-
45
-
46
-
47
-
48
-
49
-
50
-
51
-
52
-
53
-
54
-
55
-
56
-
57
-
58
-
59
-
60
-
61
-
62
-
63
-
64
-
65
-
66
-
67
-
68
-
69
-
70
-
71
-
72
-
73
-
74
-
75
-
76
-
77
-
78
-
79
-
80
-
81
-
82
-
83
-
84
-
85
-
86
-
87
-
88
-
89
-
90
-
91
-
92
-
93
-
94
-
95
-
96
-
97
-
98
-
99
-
100
-
101
-
102
-
103
-
104
-
 105
105 -
 106
106 -
 107
107 -
 108
108 -
 109
109 -
 110
110 -
 111
111 -
 112
112 -
 113
113 -
 114
114 -
 115
115 -
116
-
117
-
118
-
119
-
120
-
121
-
122
-
123
-
124
-
125
-
126
-
127
-
128
-
129
-
130
-
131
-
132
-
133
-
134
-
135
-
136
-
137
-
138
-
139
-
140
-
141
-
142
-
143
-
144
-
145
-
146
-
147
-
148
-
149
-
150
-
151
-
152
-
153
-
154
-
155
-
156
-
157
-
158
 |
 |

2.
Remove the Phillips PM2.0×3.0 screw
(1)
that secures the audio board to the base enclosure
and then remove the audio board
(2)
.
Remove the audio board from
35.6-cm
(14.0-in) and
33.8-cm
(13.3-in) computers:
1.
Release the latch
(1)
that secures the board to the base enclosure.
2.
Lift the audio board
(2)
from the base enclosure.
Reverse this procedure to install the audio board.
100
Chapter 4
Removal and replacement procedures