HP 6840 HP Deskjet 6800 Printer series - (Windows) User's Guide - Page 83
Envelopes
 |
UPC - 829160429724
View all HP 6840 manuals
Add to My Manuals
Save this manual to your list of manuals |
Page 83 highlights
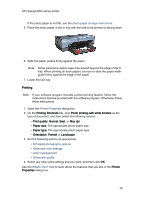
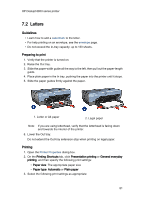
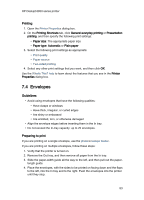
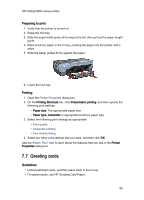
HP Deskjet 6800 series printer Printing 1. Open the Printer Properties dialog box. 2. On the Printing Shortcuts tab, click General everyday printing or Presentation printing, and then specify the following print settings: • Paper size: The appropriate paper size • Paper type: Automatic or Plain paper 3. Select the following print settings as appropriate: • Print quality • Paper source • Two-sided printing 4. Select any other print settings that you want, and then click OK. Use the What's This? help to learn about the features that you see in the Printer Properties dialog box. 7.4 Envelopes Guidelines • Avoid using envelopes that have the following qualities: • Have clasps or windows • Have thick, irregular, or curled edges • Are shiny or embossed • Are wrinkled, torn, or otherwise damaged • Align the envelope edges before inserting them in the In tray. • Do not exceed the In-tray capacity: up to 20 envelopes. Preparing to print If you are printing on a single envelope, use the photo/envelope feeder. If you are printing on multiple envelopes, follow these steps: 1. Verify that the printer is turned on. 2. Remove the Out tray, and then remove all paper from the In tray. 3. Slide the paper-width guide all the way to the left, and then pull out the paper- length guide. 4. Place the envelopes, with the sides to be printed on facing down and the flaps to the left, into the In tray and to the right. Push the envelopes into the printer until they stop. 83
-
 1
1 -
2
-
3
-
4
-
5
-
6
-
7
-
8
-
9
-
10
-
11
-
12
-
13
-
14
-
15
-
16
-
17
-
18
-
19
-
20
-
21
-
22
-
23
-
24
-
25
-
26
-
27
-
28
-
29
-
30
-
31
-
32
-
33
-
34
-
35
-
36
-
37
-
38
-
39
-
40
-
41
-
42
-
43
-
44
-
45
-
46
-
47
-
48
-
49
-
50
-
51
-
52
-
53
-
54
-
55
-
56
-
57
-
58
-
59
-
60
-
61
-
62
-
63
-
64
-
65
-
66
-
67
-
68
-
69
-
70
-
71
-
72
-
73
-
74
-
75
-
76
-
77
-
 78
78 -
 79
79 -
 80
80 -
 81
81 -
 82
82 -
 83
83 -
 84
84 -
 85
85 -
 86
86 -
 87
87 -
 88
88 -
89
-
90
-
91
-
92
-
93
-
94
-
95
-
96
-
97
-
98
-
99
-
100
-
101
-
102
-
103
-
104
-
105
-
106
-
107
-
108
-
109
-
110
-
111
-
112
-
113
-
114
-
115
-
116
-
117
-
118
-
119
-
120
-
121
-
122
-
123
-
124
-
125
-
126
-
127
-
128
-
129
-
130
-
131
-
132
-
133
-
134
-
135
-
136
-
137
-
138
-
139
-
140
-
141
-
142
-
143
-
144
-
145
-
146
-
147
-
148
-
149
-
150
-
151
-
152
-
153
-
154
-
155
-
156
-
157
-
158
-
159
-
160
-
161
-
162
-
163
-
164
-
165
-
166
-
167
-
168
-
169
-
170
-
171
-
172
-
173
-
174
-
175
-
176
-
177
-
178
-
179
-
180
-
181
-
182
-
183
-
184
-
185
-
186
-
187
-
188
-
189
-
190
-
191
-
192
-
193
 |
 |
