HP Bc1500 HP PC Session Allocation Manager (SAM) Administrator User Guide - Page 12
Web Resources Configuration, New Web Site, IP Address, Enter the SQL server name
 |
View all HP Bc1500 manuals
Add to My Manuals
Save this manual to your list of manuals |
Page 12 highlights
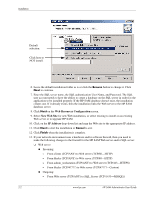
Installation Default selection: Click here to NOT install. 6. Leave the default installation folder as is or click the Browse button to change it. Click Next to continue. 7. Enter the SQL server name, the SQL authentication User Name, and Password. The SQL user account needs to have the ability to create a database on the SQL server in order for the application to be installed properly. If the HP SAM database doesn't exist, the installation creates one. If it already exists, then the installation links the Web server to the HP SAM database server. 8. Click Next on the Web Resources Configuration screen. 9. Select New Web Site for new Web installation, or select existing to install on an existing Web server or to upgrade HP SAM. 10. Click on the IP Address drop-down list and map the Web site to the appropriate IP address. 11. Click Next to start the installation or Cancel to exit. 12. Click Finish when the installation is complete. 13. If your network environment uses a hardware and/or software firewall, then you need to make the following changes to the firewall for the HP SAM Web server and/or SQL server: ❏ Web server ◆ Incoming: - From clients (TCP/ANY) to Web server (TCP/80-HTTP) - From blades (TCP/ANY) to Web server (TCP/80-HTTP) - From admin_workstation (TCP/ANY) to Web server (TCP/443-HTTPS) - From blades (TCP/47777) to Web server (TCP/47777-Custom) ◆ Outgoing: - From Web server (TCP/ANY) to SQL_Server (TCP/1433-MSSQL)) 2-2 www.hp.com HP SAM Administrator User Guide
-
 1
1 -
2
-
3
-
4
-
5
-
6
-
 7
7 -
 8
8 -
 9
9 -
 10
10 -
 11
11 -
 12
12 -
 13
13 -
 14
14 -
 15
15 -
 16
16 -
 17
17 -
18
-
19
-
20
-
21
-
22
-
23
-
24
-
25
-
26
-
27
-
28
-
29
-
30
-
31
-
32
-
33
-
34
-
35
-
36
-
37
-
38
-
39
-
40
-
41
-
42
-
43
-
44
-
45
-
46
-
47
-
48
 |
 |
