HP Brio 81XX hp brio 81xx, upgrade guide - Page 46
Installing an Additional 3.5-inch Hard Disk Drive, Installing the Drive
 |
View all HP Brio 81XX manuals
Add to My Manuals
Save this manual to your list of manuals |
Page 46 highlights
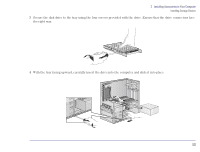
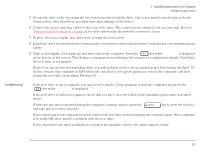
2 Installing Accessories in Your Computer Installing Storage Devices Installing an Additional 3.5-inch Hard Disk Drive Refer to the drive's manual(s) to see if you must set jumpers or if there is a special installation procedure to follow. Note If your new hard disk drive already has a mounting tray attached, you must remove it before you can install the drive in your computer. Installing the Drive 1 Remove the computer's cover (refer to "Removing the Cover" on page 22). 2 Unscrew and remove the access plate on the rear of the computer. 3 Pass the drive through the shelf (with the connectors pointing towards the front of the computer). Step 2 Step 3 4 Secure the drive to the computer using the four screws provided with the drive. Two screws must be inserted in each side. Using screws other than those provided may cause damage to the device. 5 Resecure the access plate on the rear of the computer. 46
-
 1
1 -
2
-
3
-
4
-
5
-
6
-
7
-
8
-
9
-
10
-
11
-
12
-
13
-
14
-
15
-
16
-
17
-
18
-
19
-
20
-
21
-
22
-
23
-
24
-
25
-
26
-
27
-
28
-
29
-
30
-
31
-
32
-
33
-
34
-
35
-
36
-
37
-
38
-
39
-
40
-
 41
41 -
 42
42 -
 43
43 -
 44
44 -
 45
45 -
 46
46 -
 47
47 -
 48
48 -
 49
49 -
 50
50 -
 51
51 -
52
-
53
-
54
-
55
-
56
-
57
-
58
-
59
-
60
-
61
-
62
-
63
-
64
 |
 |
