HP Brio 81XX hp brio 81xx, upgrade guide - Page 54
F2=Setup
 |
View all HP Brio 81XX manuals
Add to My Manuals
Save this manual to your list of manuals |
Page 54 highlights
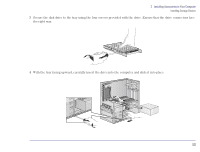
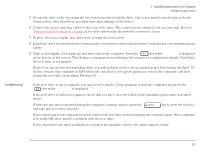
2 Installing Accessories in Your Computer Installing Storage Devices 9 Turn on the display, let it warm up, and then turn on the computer. Press the key while F2=Setup is displayed at the bottom of the screen. This displays a summary screen showing the computer's configuration details. Check that the new drive is recognized. Depending on the type of drive you have installed, you may need to install some driver software. Troubleshooting Ì If the new drive is not recognized, check that you have correctly followed the installation procedure described above. Ì If there are any errors reported during the computer's startup routine, press the and take any necessary action(s). key to view the error(s), Ì If you experience any other problems as a result of the upgrade, refer to the online support center. 54
-
 1
1 -
2
-
3
-
4
-
5
-
6
-
7
-
8
-
9
-
10
-
11
-
12
-
13
-
14
-
15
-
16
-
17
-
18
-
19
-
20
-
21
-
22
-
23
-
24
-
25
-
26
-
27
-
28
-
29
-
30
-
31
-
32
-
33
-
34
-
35
-
36
-
37
-
38
-
39
-
40
-
41
-
42
-
43
-
44
-
45
-
46
-
47
-
48
-
 49
49 -
 50
50 -
 51
51 -
 52
52 -
 53
53 -
 54
54 -
 55
55 -
 56
56 -
 57
57 -
 58
58 -
 59
59 -
60
-
61
-
62
-
63
-
64
 |
 |