HP Brio 81XX hp brio 81xx, upgrade guide - Page 56
Caution, Installing the New, Processor, Setting the, Processor Speed
 |
View all HP Brio 81XX manuals
Add to My Manuals
Save this manual to your list of manuals |
Page 56 highlights
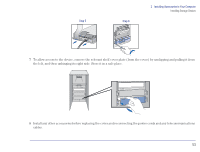
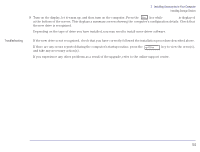
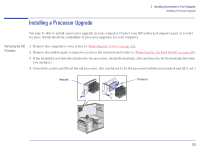
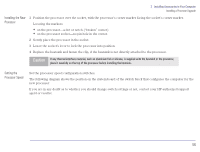
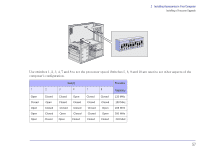
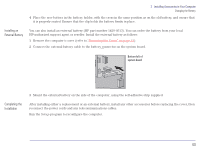
2 Installing Accessories in Your Computer Installing a Processor Upgrade Installing the New 1 Position the processor over the socket, with the processor's corner marker facing the socket's corner marker. Processor Locating the markers: • on the processor-a dot or notch ("broken" corner) • on the processor socket-no pin hole in the corner. 2 Gently place the processor in the socket. 3 Lower the socket's lever to lock the processor into position. 4 Replace the heatsink and fasten the clip, if the heatsink is not directly attached to the processor. Caution If any thermal interface material, such as aluminium foil or silicone, is supplied with the heatsink or the processor, place it carefully on the top of the processor before installing the heatsink. Setting the Processor Speed Set the processor speed configuration switches. The following diagram shows the position on the system board of the switch block that configures the computer for the new processor. If you are in any doubt as to whether you should change switch settings or not, contact your HP-authorized support agent or reseller. 56
-
 1
1 -
2
-
3
-
4
-
5
-
6
-
7
-
8
-
9
-
10
-
11
-
12
-
13
-
14
-
15
-
16
-
17
-
18
-
19
-
20
-
21
-
22
-
23
-
24
-
25
-
26
-
27
-
28
-
29
-
30
-
31
-
32
-
33
-
34
-
35
-
36
-
37
-
38
-
39
-
40
-
41
-
42
-
43
-
44
-
45
-
46
-
47
-
48
-
49
-
50
-
 51
51 -
 52
52 -
 53
53 -
 54
54 -
 55
55 -
 56
56 -
 57
57 -
 58
58 -
 59
59 -
 60
60 -
 61
61 -
62
-
63
-
64
 |
 |
