HP Brio 81XX hp brio 81xx, upgrade guide - Page 49
Installing a 5.25-inch Hard Disk Drive in the Bottom Shelf
 |
View all HP Brio 81XX manuals
Add to My Manuals
Save this manual to your list of manuals |
Page 49 highlights
2 Installing Accessories in Your Computer Installing Storage Devices Installing a 5.25-inch Hard Disk Drive in the Bottom Shelf Refer to the drive's manual(s) to see if you must set jumpers or if there is a special installation procedure to follow. Installing the Drive 1 Remove the computer's cover (refer to "Removing the Cover" on page 22). 2 Remove the power supply as follows: a At the rear of the computer, remove the four screws that secure the power supply in place. b Slide the power supply unit out and place it next to the computer. 49
-
 1
1 -
2
-
3
-
4
-
5
-
6
-
7
-
8
-
9
-
10
-
11
-
12
-
13
-
14
-
15
-
16
-
17
-
18
-
19
-
20
-
21
-
22
-
23
-
24
-
25
-
26
-
27
-
28
-
29
-
30
-
31
-
32
-
33
-
34
-
35
-
36
-
37
-
38
-
39
-
40
-
41
-
42
-
43
-
 44
44 -
 45
45 -
 46
46 -
 47
47 -
 48
48 -
 49
49 -
 50
50 -
 51
51 -
 52
52 -
 53
53 -
 54
54 -
55
-
56
-
57
-
58
-
59
-
60
-
61
-
62
-
63
-
64
 |
 |

49
2
Installing Accessories in Your Computer
Installing Storage Devices
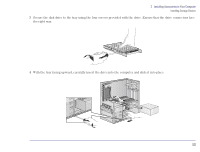
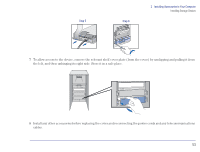
Installing a 5.25-inch Hard Disk Drive in the Bottom Shelf
Refer to the drive’s manual(s) to see if you must set jumpers or if there is a special installation procedure to follow.
Installing the Drive
1
Remove the computer’s cover (refer to
“
Removing the Cover
” on page 22
).
2
Remove the power supply as follows:
a
At the rear of the computer, remove the four screws that secure the power supply in place.
b
Slide the power supply unit out and place it next to the computer.