HP Brocade 8/12c Brocade Network Advisor Migration Guide v11.1x (53-1002321-01 - Page 24
Installing the application, Select Install Folder
 |
View all HP Brocade 8/12c manuals
Add to My Manuals
Save this manual to your list of manuals |
Page 24 highlights
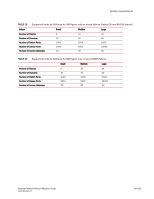
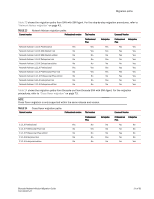
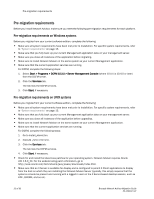
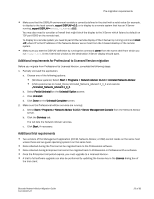
Installing the application Installing the application Use Table 25 to help install the application. TABLE 25 Management application installation Operating system Procedures Windows or UNIX systems To install the application, review the following sections: • "Pre-migration requirements on Windows systems" on page 22 • "Pre-migration requirements on UNIX systems" on page 22 • "Additional requirements for Professional to Licensed Version migration" on page 23 • "Additional trial requirements" on page 23 • "Installing the application" on page 24 Use this procedure to install Network Advisor SAN with SMI Agent or SMI Agent only on both Windows and UNIX systems. To install the new application version, complete the following steps. 1. Insert the installation DVD into the DVD-ROM drive. • For Windows systems, if autorun is enabled, the DVD Index page launches automatically. Click the Install link. If autorun is not enabled, open this file: DVD_Drive\Application_Name\windows\install.exe. • For UNIX systems, open this file: DVD_Drive\Application_Name\UNIX_Platform\install.bin. 2. Click Next on the Introduction screen. 3. Read the agreement on the License Agreement screen, select I accept the terms of the License Agreement, and click Next. 4. Select the usual location for your system application files (for example, D:\Program Files\Application_Name 11.1.X or opt/Application_Name 11_1_X) on the Select Install Folder screen and click Next. NOTE Do not install to the root directory C:\ (Windows) or / (UNIX). 5. Review the displayed installation summary on the Pre-Installation Summary screen and click Install. 6. Make sure the Launch Configuration check box is selected (default) on the Installation Complete screen, and click Done. To migrate data and configure the application, refer to one of the following sections: • "Cross operating system migration" on page 25 • "DCFM migration" on page 27 • "Network Advisor migration" on page 43 • "Cross flavor migration" on page 73 • "Unsupported server migration" on page 74 24 of 82 Brocade Network Advisor Migration Guide 53-1002321-01
-
 1
1 -
2
-
3
-
4
-
5
-
6
-
7
-
8
-
9
-
10
-
11
-
12
-
13
-
14
-
15
-
16
-
17
-
18
-
 19
19 -
 20
20 -
 21
21 -
 22
22 -
 23
23 -
 24
24 -
 25
25 -
 26
26 -
 27
27 -
 28
28 -
 29
29 -
30
-
31
-
32
-
33
-
34
-
35
-
36
-
37
-
38
-
39
-
40
-
41
-
42
-
43
-
44
-
45
-
46
-
47
-
48
-
49
-
50
-
51
-
52
-
53
-
54
-
55
-
56
-
57
-
58
-
59
-
60
-
61
-
62
-
63
-
64
-
65
-
66
-
67
-
68
-
69
-
70
-
71
-
72
-
73
-
74
-
75
-
76
-
77
-
78
-
79
-
80
-
81
-
82
 |
 |
