HP Color LaserJet Enterprise MFP M480 Color LaserJet Enterprise MFP M480 User - Page 83
Configure Email Settings, Add SMTP server
 |
View all HP Color LaserJet Enterprise MFP M480 manuals
Add to My Manuals
Save this manual to your list of manuals |
Page 83 highlights
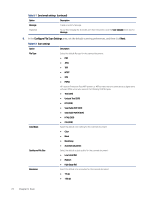
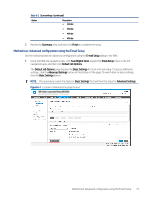
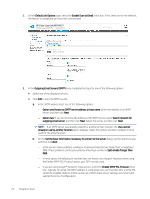
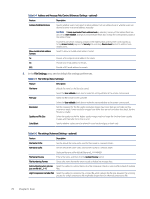
○ Select Always use these credentials, enter the User name and Password, and then click Next. ● Option three: Add the SMTP server. a. Select Add SMTP server. b. Enter the Server Name and Port Number, and then click Next. NOTE: In most cases, the default port number does not need to be changed. NOTE: If you are using a hosted SMTP service such as Gmail, verify the SMTP address, port number, and SSL settings from the service provider's website or other sources. Typically, for Gmail, the SMTP address is smtp.gmail.com, port number 465, and the SSL should be enabled. Please refer to online sources to confirm these server settings are current and valid at the time of configuration. c. Select the appropriate server authentication option: - Server does not require authentication: Select Server does not require authentication, and then click Next. -OR- - Server requires authentication: Select an option from the Server requires authentication drop-down list: ○ Select Use credentials of user to connect after Sign In at the control panel, and then click Next. -OR- ○ Select Always use these credentials, enter the User name and Password, and then click Next. 5. On the Configure Email Settings dialog, enter the following information about the sender's email address, and then click Next. NOTE: When setting up the From, Subject, and Message fields, if the User editable check box is unchecked, users will not be able to edit those fields at the printer control panel when sending an email. Table 6-1 Send email settings Option From (Required) Subject (Optional) Description Select one of the following options from the From drop-down list: ● User's address (sign-in required) ● Default From: Enter a default email address and display name in the Default From Email Address and Default Display Name fields NOTE: Create an email account for the printer, and use this address for the default email address. NOTE: Configure the email feature so that users must sign in before using it. This prevents users from sending an email from an address that is not their own. Provide a default subject line for the email messages. Method one: Basic configuration using the Email Setup Wizard 71
-
 1
1 -
2
-
3
-
4
-
5
-
6
-
7
-
8
-
9
-
10
-
11
-
12
-
13
-
14
-
15
-
16
-
17
-
18
-
19
-
20
-
21
-
22
-
23
-
24
-
25
-
26
-
27
-
28
-
29
-
30
-
31
-
32
-
33
-
34
-
35
-
36
-
37
-
38
-
39
-
40
-
41
-
42
-
43
-
44
-
45
-
46
-
47
-
48
-
49
-
50
-
51
-
52
-
53
-
54
-
55
-
56
-
57
-
58
-
59
-
60
-
61
-
62
-
63
-
64
-
65
-
66
-
67
-
68
-
69
-
70
-
71
-
72
-
73
-
74
-
75
-
76
-
77
-
 78
78 -
 79
79 -
 80
80 -
 81
81 -
 82
82 -
 83
83 -
 84
84 -
 85
85 -
 86
86 -
 87
87 -
 88
88 -
89
-
90
-
91
-
92
-
93
-
94
-
95
-
96
-
97
-
98
-
99
-
100
-
101
-
102
-
103
-
104
-
105
-
106
-
107
-
108
-
109
-
110
-
111
-
112
-
113
-
114
-
115
-
116
-
117
-
118
-
119
-
120
-
121
-
122
-
123
-
124
-
125
-
126
-
127
-
128
-
129
-
130
-
131
-
132
-
133
-
134
-
135
-
136
-
137
-
138
-
139
-
140
-
141
-
142
-
143
-
144
-
145
-
146
-
147
-
148
-
149
-
150
-
151
-
152
-
153
-
154
-
155
-
156
-
157
-
158
-
159
-
160
-
161
-
162
-
163
-
164
-
165
-
166
-
167
-
168
-
169
-
170
-
171
-
172
-
173
-
174
-
175
-
176
-
177
-
178
-
179
-
180
-
181
-
182
-
183
-
184
-
185
-
186
-
187
-
188
-
189
-
190
-
191
-
192
-
193
-
194
-
195
-
196
-
197
-
198
-
199
-
200
-
201
-
202
-
203
-
204
-
205
-
206
-
207
-
208
-
209
-
210
-
211
-
212
-
213
-
214
-
215
-
216
-
217
-
218
-
219
-
220
-
221
-
222
-
223
-
224
-
225
-
226
-
227
-
228
-
229
-
230
-
231
-
232
-
233
-
234
-
235
-
236
-
237
-
238
-
239
-
240
-
241
-
242
-
243
-
244
-
245
-
246
-
247
-
248
-
249
-
250
-
251
-
252
 |
 |
