HP Color LaserJet Enterprise MFP M480 Color LaserJet Enterprise MFP M480 User - Page 85
Method two: Advanced configuration using the Email Setup, Summary, Finish, E-mail Setup
 |
View all HP Color LaserJet Enterprise MFP M480 manuals
Add to My Manuals
Save this manual to your list of manuals |
Page 85 highlights
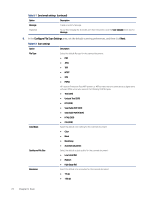
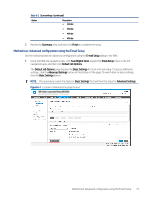
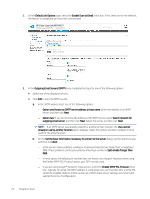
Table 6-2 Scan settings (continued) Option Description ● 200 dpi ● 300 dpi ● 400 dpi ● 600 dpi 7. Review the Summary area, and then click Finish to complete the setup. Method two: Advanced configuration using the Email Setup Use the following steps for advanced configuration using the E-mail Setup dialog in the EWS. 1. Using the EWS top navigation tabs, click Scan/Digital Send, expand the Email Setup menu in the left navigation pane, and then click Default Job Options. The Default Job Options page displays the Basic Settings for Scan to Email setup. To access additional settings, click the Advanced Settings button at the bottom of the page. To switch back to basic settings, click the Basic Settings button. NOTE: This procedure covers the steps for Basic Settings first and then the steps for Advanced Settings. Figure 6-1 Location of Advanced Settings button Method two: Advanced configuration using the Email Setup 73
-
 1
1 -
2
-
3
-
4
-
5
-
6
-
7
-
8
-
9
-
10
-
11
-
12
-
13
-
14
-
15
-
16
-
17
-
18
-
19
-
20
-
21
-
22
-
23
-
24
-
25
-
26
-
27
-
28
-
29
-
30
-
31
-
32
-
33
-
34
-
35
-
36
-
37
-
38
-
39
-
40
-
41
-
42
-
43
-
44
-
45
-
46
-
47
-
48
-
49
-
50
-
51
-
52
-
53
-
54
-
55
-
56
-
57
-
58
-
59
-
60
-
61
-
62
-
63
-
64
-
65
-
66
-
67
-
68
-
69
-
70
-
71
-
72
-
73
-
74
-
75
-
76
-
77
-
78
-
79
-
 80
80 -
 81
81 -
 82
82 -
 83
83 -
 84
84 -
 85
85 -
 86
86 -
 87
87 -
 88
88 -
 89
89 -
 90
90 -
91
-
92
-
93
-
94
-
95
-
96
-
97
-
98
-
99
-
100
-
101
-
102
-
103
-
104
-
105
-
106
-
107
-
108
-
109
-
110
-
111
-
112
-
113
-
114
-
115
-
116
-
117
-
118
-
119
-
120
-
121
-
122
-
123
-
124
-
125
-
126
-
127
-
128
-
129
-
130
-
131
-
132
-
133
-
134
-
135
-
136
-
137
-
138
-
139
-
140
-
141
-
142
-
143
-
144
-
145
-
146
-
147
-
148
-
149
-
150
-
151
-
152
-
153
-
154
-
155
-
156
-
157
-
158
-
159
-
160
-
161
-
162
-
163
-
164
-
165
-
166
-
167
-
168
-
169
-
170
-
171
-
172
-
173
-
174
-
175
-
176
-
177
-
178
-
179
-
180
-
181
-
182
-
183
-
184
-
185
-
186
-
187
-
188
-
189
-
190
-
191
-
192
-
193
-
194
-
195
-
196
-
197
-
198
-
199
-
200
-
201
-
202
-
203
-
204
-
205
-
206
-
207
-
208
-
209
-
210
-
211
-
212
-
213
-
214
-
215
-
216
-
217
-
218
-
219
-
220
-
221
-
222
-
223
-
224
-
225
-
226
-
227
-
228
-
229
-
230
-
231
-
232
-
233
-
234
-
235
-
236
-
237
-
238
-
239
-
240
-
241
-
242
-
243
-
244
-
245
-
246
-
247
-
248
-
249
-
250
-
251
-
252
 |
 |
