HP EliteBook G7 Maintenance and Service Guide - Page 56
WARNING, IMPORTANT, before you remove the battery.
 |
View all HP EliteBook G7 manuals
Add to My Manuals
Save this manual to your list of manuals |
Page 56 highlights
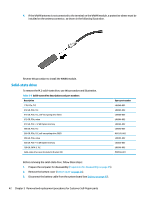
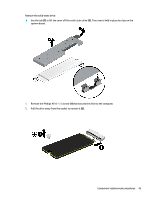
WARNING! To avoid personal injury and damage to the product: ● Do not puncture, twist, or crack the battery. ● Do not cause an external puncture or rupture to the battery. They can cause a short inside the battery, which can result in battery thermal runaway. ● Do not handle or touch the battery enclosure with sharp objects such as tweezers or pliers, which might puncture the battery. ● Do not compress or squeeze the battery case with tools or heavy objects stacked on top of the case. These actions can apply undue force on the battery. ● Do not touch the connectors with any metallic surface or object, such as metal tools, screws, or coins, which can cause shorting across the connectors. Before removing the battery, follow these steps: 1. Prepare the computer for disassembly (Preparation for disassembly on page 35). 2. Remove the bottom cover (Bottom cover on page 35). WARNING! To reduce potential safety issues, use only the user-replaceable battery provided with the computer, a replacement battery provided by HP, or a compatible battery purchased from HP. IMPORTANT: Removing a battery that is the sole power source for the computer can cause loss of information. To prevent loss of information, save your work or shut down the computer through Windows before you remove the battery. Remove the battery: 1. Remove the speaker cable from the clips along the bottom of the battery (1). 2. Lift the tape from the battery cable connector (2), and then disconnect the battery cable from the system board (3). 3. Remove the four Phillips M2.0 × 4.0 screws (4) that secure the battery to the computer. 46 Chapter 6 Removal and replacement procedures for authorized service provider parts
-
 1
1 -
2
-
3
-
4
-
5
-
6
-
7
-
8
-
9
-
10
-
11
-
12
-
13
-
14
-
15
-
16
-
17
-
18
-
19
-
20
-
21
-
22
-
23
-
24
-
25
-
26
-
27
-
28
-
29
-
30
-
31
-
32
-
33
-
34
-
35
-
36
-
37
-
38
-
39
-
40
-
41
-
42
-
43
-
44
-
45
-
46
-
47
-
48
-
49
-
50
-
 51
51 -
 52
52 -
 53
53 -
 54
54 -
 55
55 -
 56
56 -
 57
57 -
 58
58 -
 59
59 -
 60
60 -
 61
61 -
62
-
63
-
64
-
65
-
66
-
67
-
68
-
69
-
70
-
71
-
72
-
73
-
74
-
75
-
76
-
77
-
78
-
79
-
80
-
81
-
82
-
83
-
84
-
85
-
86
-
87
-
88
-
89
-
90
-
91
-
92
-
93
-
94
-
95
-
96
-
97
-
98
-
99
-
100
-
101
-
102
-
103
-
104
-
105
-
106
-
107
-
108
-
109
-
110
-
111
-
112
-
113
-
114
 |
 |
