HP EliteBook G7 Maintenance and Service Guide - Page 77
alignment tools., Remove the alignment tool.
 |
View all HP EliteBook G7 manuals
Add to My Manuals
Save this manual to your list of manuals |
Page 77 highlights
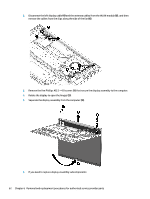
e. Insert the top of the panel into the top of the display rear cover (6), and then rotate the panel into place (7). Be sure that the upper corners of the panel are positioned up against the insides of the alignment tools. f. Remove the alignment tool. g. Replace the bezel by pressing along the bottom, sides, and then top of the bezel to snap it into place. Component replacement procedures 67
-
 1
1 -
2
-
3
-
4
-
5
-
6
-
7
-
8
-
9
-
10
-
11
-
12
-
13
-
14
-
15
-
16
-
17
-
18
-
19
-
20
-
21
-
22
-
23
-
24
-
25
-
26
-
27
-
28
-
29
-
30
-
31
-
32
-
33
-
34
-
35
-
36
-
37
-
38
-
39
-
40
-
41
-
42
-
43
-
44
-
45
-
46
-
47
-
48
-
49
-
50
-
51
-
52
-
53
-
54
-
55
-
56
-
57
-
58
-
59
-
60
-
61
-
62
-
63
-
64
-
65
-
66
-
67
-
68
-
69
-
70
-
71
-
 72
72 -
 73
73 -
 74
74 -
 75
75 -
 76
76 -
 77
77 -
 78
78 -
 79
79 -
 80
80 -
 81
81 -
 82
82 -
83
-
84
-
85
-
86
-
87
-
88
-
89
-
90
-
91
-
92
-
93
-
94
-
95
-
96
-
97
-
98
-
99
-
100
-
101
-
102
-
103
-
104
-
105
-
106
-
107
-
108
-
109
-
110
-
111
-
112
-
113
-
114
 |
 |

e.
Insert the top of the panel into the top of the display rear cover
(6)
, and then rotate the panel into
place
(7)
. Be sure that the upper corners of the panel are positioned up against the insides of the
alignment tools.
f.
Remove the alignment tool.
g.
Replace the bezel by pressing along the bottom, sides, and then top of the bezel to snap it into
place.
Component replacement procedures
67