HP Envy 13-1100 HP ENVY 13 User Guide - Windows 7 - Page 70
External devices, Using a USB device, Connecting a USB device
 |
View all HP Envy 13-1100 manuals
Add to My Manuals
Save this manual to your list of manuals |
Page 70 highlights
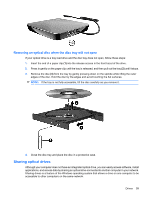
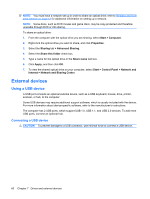
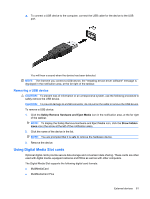
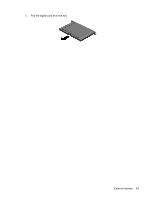
NOTE: You must have a network set up in order to share an optical drive; refer to Wireless and local area network on page 12 for additional information on setting up a network. NOTE: Some discs, such as DVD movies and game discs, may be copy-protected and therefore unusable through DVD or CD sharing. To share an optical drive: 1. From the computer with the optical drive you are sharing, select Start > Computer. 2. Right-click the optical drive you want to share, and click Properties. 3. Select the Sharing tab > Advanced Sharing. 4. Select the Share this folder check box. 5. Type a name for the optical drive in the Share name text box. 6. Click Apply, and then click OK. 7. To view the shared optical drive on your computer, select Start > Control Panel > Network and Internet > Network and Sharing Center. External devices Using a USB device A USB port connects an optional external device, such as a USB keyboard, mouse, drive, printer, scanner, or hub, to the computer. Some USB devices may require additional support software, which is usually included with the device. For more information about device-specific software, refer to the manufacturer's instructions. The computer has 2 USB ports, which support USB 1.0, USB 1.1, and USB 2.0 devices. To add more USB ports, connect an optional hub. Connecting a USB device CAUTION: To prevent damage to a USB connector, use minimal force to connect a USB device. 60 Chapter 7 Drives and external devices
-
 1
1 -
2
-
3
-
4
-
5
-
6
-
7
-
8
-
9
-
10
-
11
-
12
-
13
-
14
-
15
-
16
-
17
-
18
-
19
-
20
-
21
-
22
-
23
-
24
-
25
-
26
-
27
-
28
-
29
-
30
-
31
-
32
-
33
-
34
-
35
-
36
-
37
-
38
-
39
-
40
-
41
-
42
-
43
-
44
-
45
-
46
-
47
-
48
-
49
-
50
-
51
-
52
-
53
-
54
-
55
-
56
-
57
-
58
-
59
-
60
-
61
-
62
-
63
-
64
-
 65
65 -
 66
66 -
 67
67 -
 68
68 -
 69
69 -
 70
70 -
 71
71 -
 72
72 -
 73
73 -
 74
74 -
 75
75 -
76
-
77
-
78
-
79
-
80
-
81
-
82
-
83
-
84
-
85
-
86
-
87
-
88
-
89
-
90
-
91
-
92
-
93
-
94
-
95
 |
 |