HP LaserJet 6p/mp Service Manual - Page 76
To reinstall, Back Cover removal 2 of 2
 |
View all HP LaserJet 6p/mp manuals
Add to My Manuals
Save this manual to your list of manuals |
Page 76 highlights
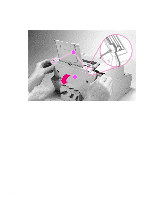
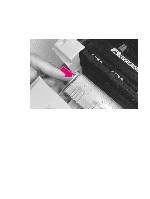
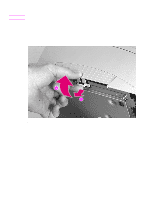
5 Separate the rear panel from the main cover, pulling the lower corners away from the printer first. Then, insert the small flathead screwdriver into the openings at the top to pop the upper corners (Figure 6-3, callout 1). 6 Remove the cover by grabbing it on both sides and pulling it straight back with a firm pull (Figure 6-3, callout 2). 1 2 Figure 6-3 Back Cover removal (2 of 2) To reinstall Make certain the Input Extender is raised before you reinstall the back cover. 74 Removal and replacement EN
-
 1
1 -
2
-
3
-
4
-
5
-
6
-
7
-
8
-
9
-
10
-
11
-
12
-
13
-
14
-
15
-
16
-
17
-
18
-
19
-
20
-
21
-
22
-
23
-
24
-
25
-
26
-
27
-
28
-
29
-
30
-
31
-
32
-
33
-
34
-
35
-
36
-
37
-
38
-
39
-
40
-
41
-
42
-
43
-
44
-
45
-
46
-
47
-
48
-
49
-
50
-
51
-
52
-
53
-
54
-
55
-
56
-
57
-
58
-
59
-
60
-
61
-
62
-
63
-
64
-
65
-
66
-
67
-
68
-
69
-
70
-
 71
71 -
 72
72 -
 73
73 -
 74
74 -
 75
75 -
 76
76 -
 77
77 -
 78
78 -
 79
79 -
 80
80 -
 81
81 -
82
-
83
-
84
-
85
-
86
-
87
-
88
-
89
-
90
-
91
-
92
-
93
-
94
-
95
-
96
-
97
-
98
-
99
-
100
-
101
-
102
-
103
-
104
-
105
-
106
-
107
-
108
-
109
-
110
-
111
-
112
-
113
-
114
-
115
-
116
-
117
-
118
-
119
-
120
-
121
-
122
-
123
-
124
-
125
-
126
-
127
-
128
-
129
-
130
-
131
-
132
-
133
-
134
-
135
-
136
-
137
-
138
-
139
-
140
-
141
-
142
-
143
-
144
-
145
-
146
-
147
-
148
-
149
-
150
-
151
-
152
-
153
-
154
-
155
-
156
-
157
-
158
-
159
-
160
-
161
-
162
-
163
-
164
-
165
-
166
-
167
-
168
-
169
-
170
-
171
-
172
-
173
-
174
-
175
-
176
-
177
-
178
-
179
-
180
-
181
-
182
-
183
-
184
-
185
-
186
-
187
-
188
-
189
-
190
-
191
-
192
-
193
-
194
 |
 |

74
Removal and replacement
EN
5
Separate the rear panel from the main cover, pulling the lower corners away from the printer first.
Then, insert the small flathead screwdriver into the openings at the top to pop the upper corners
(Figure 6-3, callout 1).
6
Remove the cover by grabbing it on both sides and pulling it straight back with a firm pull (Figure
6-3, callout 2).
Figure
6-3
Back Cover removal (2 of 2)
To reinstall
Make certain the Input Extender is raised before you reinstall the back cover.
2
1