HP LaserJet Enterprise 600 HP LaserJet Enterprise 600 M601, M602, and M603 Ser - Page 102
Job Storage tab features, Printer Hard Disk
 |
View all HP LaserJet Enterprise 600 manuals
Add to My Manuals
Save this manual to your list of manuals |
Page 102 highlights
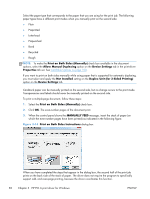
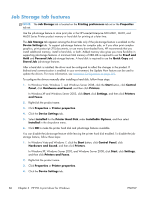
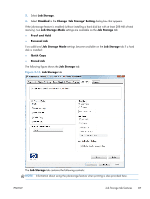
Job Storage tab features NOTE: The Job Storage tab is located on the Printing preferences tab set or the Properties tab set. Use the job-storage feature to store print jobs in the HP LaserJet Enterprise 600 M601, M602, and M603 Series Printer product memory or hard disk for printing at a later time. The Job Storage tab appears among the driver tabs only if the job-storage feature is enabled on the Device Settings tab. To support job-storage features for complex jobs, or if you often print complex graphics, print postscript (.PS) documents, or use many downloaded fonts, HP recommends that you install additional memory, install a hard disk, or both. Added memory also gives you more flexibility in supporting job-storage features. A minimum total memory of 288 MB is required to use the Proof and Hold and Personal Job job-storage features. A hard disk is required to use the Quick Copy and Stored Job job-storage features. After a hard disk is installed, the driver must be configured to reflect the changes in the product. If bidirectional communication is enabled in your environment, the Update Now feature can be used to update the drivers. For more information, see Automatic Configuration on page 101. To configure the drivers manually after installing a hard disk, follow these steps: 1. In Windows Vista, Windows 7, and Windows Server 2008, click the Start button, click Control Panel, click Hardware and Sound, and then click Printers. In Windows XP and Windows Server 2003, click Start, click Settings, and then click Printers and Faxes. 2. Right-click the product name. 3. Click Properties or Printer properties. 4. Click the Device Settings tab. 5. Select Installed for the Printer Hard Disk under Installable Options, and then select Installed in the drop-down menu. 6. Click OK to make the printer hard disk and job-storage features available. You can disable the job-storage feature while leaving the printer hard disk enabled. To disable the jobstorage feature, follow these steps: 1. In Windows Vista and Windows 7, click the Start button, click Control Panel, click Hardware and Sound, and then click Printers. In Windows XP, Windows Server 2003, and Windows Server 2008, click Start, click Settings, and then click Printers and Faxes. 2. Right-click the product name. 3. Click Properties or Printer properties. 4. Click the Device Settings tab. 86 Chapter 3 HP PCL 6 print driver for Windows ENWW
-
 1
1 -
2
-
3
-
4
-
5
-
6
-
7
-
8
-
9
-
10
-
11
-
12
-
13
-
14
-
15
-
16
-
17
-
18
-
19
-
20
-
21
-
22
-
23
-
24
-
25
-
26
-
27
-
28
-
29
-
30
-
31
-
32
-
33
-
34
-
35
-
36
-
37
-
38
-
39
-
40
-
41
-
42
-
43
-
44
-
45
-
46
-
47
-
48
-
49
-
50
-
51
-
52
-
53
-
54
-
55
-
56
-
57
-
58
-
59
-
60
-
61
-
62
-
63
-
64
-
65
-
66
-
67
-
68
-
69
-
70
-
71
-
72
-
73
-
74
-
75
-
76
-
77
-
78
-
79
-
80
-
81
-
82
-
83
-
84
-
85
-
86
-
87
-
88
-
89
-
90
-
91
-
92
-
93
-
94
-
95
-
96
-
 97
97 -
 98
98 -
 99
99 -
 100
100 -
 101
101 -
 102
102 -
 103
103 -
 104
104 -
 105
105 -
 106
106 -
 107
107 -
108
-
109
-
110
-
111
-
112
-
113
-
114
-
115
-
116
-
117
-
118
-
119
-
120
-
121
-
122
-
123
-
124
-
125
-
126
-
127
-
128
-
129
-
130
-
131
-
132
-
133
-
134
-
135
-
136
-
137
-
138
-
139
-
140
-
141
-
142
-
143
-
144
-
145
-
146
-
147
-
148
-
149
-
150
-
151
-
152
-
153
-
154
-
155
-
156
-
157
-
158
-
159
-
160
-
161
-
162
-
163
-
164
-
165
-
166
-
167
-
168
 |
 |
