HP LaserJet Enterprise P3015 HP LaserJet P3010 Series - Software Technical Ref - Page 87
Install from the printing-system software CD
 |
View all HP LaserJet Enterprise P3015 manuals
Add to My Manuals
Save this manual to your list of manuals |
Page 87 highlights
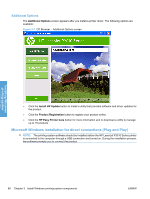
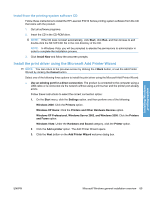
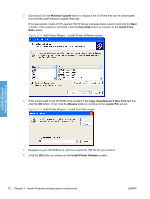
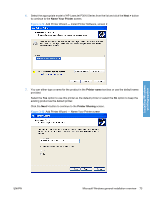
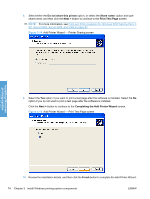
Install from the printing-system software CD Follow these instructions to install the HP LaserJet P3010 Series printing system software from the CD that came with the product. 1. Quit all software programs. 2. Insert the CD in the CD-ROM drive. NOTE: If the CD does not start automatically, click Start, click Run, and then browse to and double-click the SETUP.EXE file in the root directory of the CD. NOTE: In Windows Vista, you will be prompted to elevate the permissions to administrator in order to complete the installation process. 3. Click Install Now and follow the onscreen prompts. Install the print driver using the Microsoft Add Printer Wizard NOTE: You can return to the previous screen by clicking the < Back button, or exit the Add Printer Wizard by clicking the Cancel button. Select one of the following three options to install the print driver using the Microsoft Add Printer Wizard: ● Use an existing port for a direct connection: The product is connected to the computer using a USB cable or is connected via the network without using a print server and the printer port already exists. Follow these instructions to select the correct connection option: 1. On the Start menu, click the Settings option, and then perform one of the following: Windows 2000: Click the Printers option. Windows XP Home: Click the Printers and Other Hardware Devices option. Windows XP Professional, Windows Server 2003, and Windows 2008: Click the Printers and Faxes option. Windows Vista: Under the Hardware and Sound category, click the Printer option. 2. Click the Add a printer option. The Add Printer Wizard opens. 3. Click the Next button on the Add Printer Wizard welcome dialog box. Installing Windows printing-system ENWW Microsoft Windows general installation overview 69
-
 1
1 -
2
-
3
-
4
-
5
-
6
-
7
-
8
-
9
-
10
-
11
-
12
-
13
-
14
-
15
-
16
-
17
-
18
-
19
-
20
-
21
-
22
-
23
-
24
-
25
-
26
-
27
-
28
-
29
-
30
-
31
-
32
-
33
-
34
-
35
-
36
-
37
-
38
-
39
-
40
-
41
-
42
-
43
-
44
-
45
-
46
-
47
-
48
-
49
-
50
-
51
-
52
-
53
-
54
-
55
-
56
-
57
-
58
-
59
-
60
-
61
-
62
-
63
-
64
-
65
-
66
-
67
-
68
-
69
-
70
-
71
-
72
-
73
-
74
-
75
-
76
-
77
-
78
-
79
-
80
-
81
-
 82
82 -
 83
83 -
 84
84 -
 85
85 -
 86
86 -
 87
87 -
 88
88 -
 89
89 -
 90
90 -
 91
91 -
 92
92 -
93
-
94
-
95
-
96
-
97
-
98
-
99
-
100
-
101
-
102
-
103
-
104
-
105
-
106
-
107
-
108
-
109
-
110
-
111
-
112
-
113
-
114
-
115
-
116
-
117
-
118
-
119
-
120
-
121
-
122
-
123
-
124
-
125
-
126
-
127
-
128
-
129
-
130
-
131
-
132
-
133
-
134
-
135
-
136
-
137
-
138
-
139
-
140
-
141
-
142
-
143
-
144
-
145
-
146
-
147
-
148
-
149
-
150
-
151
-
152
-
153
-
154
-
155
-
156
-
157
-
158
-
159
-
160
-
161
-
162
-
163
-
164
-
165
-
166
-
167
-
168
-
169
-
170
-
171
-
172
-
173
-
174
-
175
-
176
-
177
-
178
-
179
-
180
-
181
-
182
-
183
-
184
-
185
-
186
-
187
-
188
-
189
-
190
-
191
-
192
-
193
-
194
-
195
-
196
-
197
-
198
-
199
-
200
-
201
-
202
-
203
-
204
-
205
-
206
-
207
-
208
-
209
-
210
-
211
-
212
-
213
-
214
-
215
-
216
-
217
-
218
-
219
-
220
-
221
-
222
-
223
-
224
-
225
-
226
-
227
-
228
-
229
-
230
-
231
-
232
-
233
-
234
-
235
-
236
-
237
-
238
-
239
-
240
-
241
-
242
-
243
-
244
-
245
-
246
-
247
-
248
-
249
-
250
-
251
-
252
-
253
-
254
-
255
-
256
-
257
-
258
 |
 |