HP OfficeJet Pro 7740 User Guide - Page 27
Load paper, Print, Scan & Fax
 |
View all HP OfficeJet Pro 7740 manuals
Add to My Manuals
Save this manual to your list of manuals |
Page 27 highlights
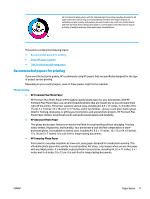
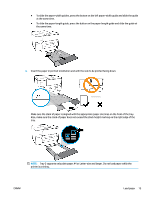
To change tray settings NOTE: You can also change the tray settings from the HP printer software or EWS. To access EWS and the printer software, see Embedded web server and Open the HP printer software (Windows). 1. Make sure the printer is turned on. 2. From the printer control panel, touch or swipe down the tab at the top of the screen to open the Dashboard, and then touch (Setup). 3. Scroll and touch Tray and Paper Management. 4. Select either Default Tray or Tray Lock, and then select the appropriate option. To turn on automatic selection of tray or paper source (Windows) 1. Open the HP printer software. For more information, see Open the HP printer software (Windows). 2. Click Set Preferences under Print, Scan & Fax . 3. In the Printing preferences dialog box, click the Printing Shortcuts tab. 4. From the Paper Source drop-down list, select one of the auto selection options. 5. Click OK twice to close the dialog box and accept changes. To turn on automatic selection of tray or paper source (OS X) 1. From the File menu in your software, choose Print. 2. Make sure your printer is selected. 3. Select Automatically Select from the Source pop-up menu, click Show Details to access the print options. Load paper To load standard paper To learn how to use Tray 2, see Work with trays. 1. Pull out the input tray completely. 2. Slide the paper guides towards the edges of the tray as far as possible. 14 Chapter 2 Get started ENWW
-
 1
1 -
2
-
3
-
4
-
5
-
6
-
7
-
8
-
9
-
10
-
11
-
12
-
13
-
14
-
15
-
16
-
17
-
18
-
19
-
20
-
21
-
 22
22 -
 23
23 -
 24
24 -
 25
25 -
 26
26 -
 27
27 -
 28
28 -
 29
29 -
 30
30 -
 31
31 -
 32
32 -
33
-
34
-
35
-
36
-
37
-
38
-
39
-
40
-
41
-
42
-
43
-
44
-
45
-
46
-
47
-
48
-
49
-
50
-
51
-
52
-
53
-
54
-
55
-
56
-
57
-
58
-
59
-
60
-
61
-
62
-
63
-
64
-
65
-
66
-
67
-
68
-
69
-
70
-
71
-
72
-
73
-
74
-
75
-
76
-
77
-
78
-
79
-
80
-
81
-
82
-
83
-
84
-
85
-
86
-
87
-
88
-
89
-
90
-
91
-
92
-
93
-
94
-
95
-
96
-
97
-
98
-
99
-
100
-
101
-
102
-
103
-
104
-
105
-
106
-
107
-
108
-
109
-
110
-
111
-
112
-
113
-
114
-
115
-
116
-
117
-
118
-
119
-
120
-
121
-
122
-
123
-
124
-
125
-
126
-
127
-
128
-
129
-
130
-
131
-
132
-
133
-
134
-
135
-
136
-
137
-
138
-
139
-
140
-
141
-
142
-
143
-
144
-
145
-
146
-
147
-
148
-
149
-
150
-
151
-
152
-
153
-
154
-
155
-
156
-
157
-
158
-
159
-
160
-
161
-
162
-
163
-
164
-
165
-
166
-
167
-
168
-
169
-
170
-
171
-
172
-
173
-
174
-
175
-
176
-
177
-
178
-
179
-
180
 |
 |