| Section |
Page |
| Product basics |
17 |
| Product overview |
18 |
| HP Officejet Pro X476 MFP Series models |
18 |
| HP Officejet Pro X576 MFP Series models |
19 |
| Environmental features |
19 |
| Accessibility features |
20 |
| Product views |
21 |
| Front view |
21 |
| Back view |
22 |
| Interface ports |
23 |
| Serial number and model number location |
24 |
| Control panel layout |
25 |
| Buttons on the Home screen |
26 |
| Control panel help system |
28 |
| Control panel menus |
29 |
| Copy menu |
29 |
| Fax menus |
31 |
| Scan menus |
32 |
| Apps |
33 |
| Plug and Print |
33 |
| Setup Menu |
33 |
| Fax Setup menu |
34 |
| Network Setup menu |
37 |
| HP Digital Solutions Setup menu |
39 |
| Device Setup menu |
39 |
| Tools menu |
43 |
| Print Reports menu |
44 |
| Connect the product |
45 |
| Connect the product using a USB cable |
45 |
| CD installation |
45 |
| Connect the product to a network |
46 |
| Supported network protocols |
46 |
| Install the product on a wired network |
46 |
| Obtain the IP address |
46 |
| Install the software |
47 |
| Configure IP network settings |
47 |
| View or change network settings |
47 |
| Set or change the product password |
48 |
| Manually configure IPv4 TCP/IP parameters from the control panel |
48 |
| Link speed and duplex settings |
49 |
| HP ePrint |
49 |
| Install the product on a wireless network (wireless models only) |
50 |
| Connect the product to a wireless network using the Wireless Setup Wizard |
50 |
| Connect the product to a wireless network using WPS |
50 |
| Install the software for a wireless product currently on the network |
51 |
| Manually connect the product to a wireless network |
51 |
| Use the product with Windows |
53 |
| Supported operating systems and printer drivers for Windows |
53 |
| Select the correct printer driver for Windows |
53 |
| HP Universal Print Driver (UPD) |
55 |
| UPD installation modes |
55 |
| Change print job settings for Windows |
55 |
| Priority for print settings |
55 |
| Change the settings for all print jobs until the software program is closed |
56 |
| Change the default settings for all print jobs |
56 |
| Change the product configuration settings |
56 |
| Remove the printer driver from Windows |
57 |
| Supported utilities for Windows |
57 |
| Other Windows components and utilities |
57 |
| Use the product with Mac |
59 |
| Supported operating systems and printer drivers for Mac |
59 |
| Software for Mac computers |
59 |
| HP Utility for Mac |
59 |
| Open the HP Utility |
60 |
| HP Utility features |
60 |
| Priority for print settings for Mac |
61 |
| Change printer-driver settings for Mac |
61 |
| Change the settings for all print jobs until the software program is closed |
61 |
| Change the default settings for all print jobs |
61 |
| Change the product configuration settings |
61 |
| Remove the printer driver from Mac operating systems |
62 |
| Supported utilities for Mac |
62 |
| HP Embedded Web Server |
62 |
| Fax with Mac |
62 |
| Scan with Mac |
63 |
| Use the HP Scan software to scan images to a Mac computer. |
63 |
| Scan using Apple Preview and Image Capture applications (Mac OS X v10.6 and later) |
63 |
| Solve problems with Mac |
64 |
| Paper and print media |
65 |
| Understand paper use |
65 |
| Change the printer driver to match the paper type and size in Windows |
66 |
| Supported paper sizes |
66 |
| Supported paper types and tray capacity |
69 |
| Load paper trays |
71 |
| Load Tray 1 (multi-purpose tray on left side of the product) |
71 |
| Load Tray 2 or optional Tray 3 |
72 |
| Load the document feeder |
73 |
| Configure trays |
74 |
| Ink cartridges |
77 |
| Ink cartridge information |
77 |
| Supplies views |
78 |
| Ink cartridge view |
78 |
| Manage ink cartridges |
78 |
| Change settings for ink cartridges |
78 |
| Print when an ink cartridge is at estimated end of life |
78 |
| Modify the Low on Ink Warning Level settings from the control panel |
79 |
| Print with General Office mode |
79 |
| Store and recycle supplies |
79 |
| Recycle supplies |
79 |
| Ink cartridge storage |
79 |
| HP policy on non-HP ink cartridges |
79 |
| HP anticounterfeit website |
79 |
| Replacement instructions |
80 |
| Replace the ink cartridges |
80 |
| Solve issues with supplies |
82 |
| Check the ink cartridges |
82 |
| Refilled or remanufactured ink cartridges |
82 |
| Interpret the Print Quality Page |
83 |
| Interpret control panel messages for supplies |
85 |
| Use SETUP cartridges |
85 |
| Do not use SETUP cartridges |
85 |
| <Color>Cartridge Low |
85 |
| <Color>Cartridge Very Low |
85 |
| Counterfeit or used <color> cartridge installed |
85 |
| Genuine HP supply installed |
85 |
| Incompatible <color> |
86 |
| Install [color] cartridge |
86 |
| Non-HP ink cartridges installed |
86 |
| Out of Ink <Color> |
86 |
| Used [color] installed |
86 |
| Print |
89 |
| Print tasks (Windows) |
89 |
| Open the printer driver with Windows |
89 |
| Get help for any printing option with Windows |
90 |
| Change the number of print copies with Windows |
91 |
| Save custom print settings for reuse with Windows |
91 |
| Use a printing shortcut with Windows |
91 |
| Create printing shortcuts |
92 |
| Improve print quality with Windows |
94 |
| Select the page size with Windows |
94 |
| Select a custom page size with Windows |
95 |
| Select the paper type with Windows |
95 |
| Select the paper tray with Windows |
95 |
| Print on both sides (duplex) with Windows |
95 |
| Automatically print on both sides with Windows |
95 |
| Print multiple pages per sheet with Windows |
97 |
| Select page orientation with Windows |
98 |
| Set Advanced color options with Windows |
99 |
| Print tasks (Mac) |
99 |
| Create and use printing presets with Mac |
99 |
| Print a cover page with Mac |
100 |
| Print multiple pages on one sheet of paper with Mac |
100 |
| Print on both sides of the page (duplex printing) with Mac |
101 |
| Set the color options with Mac |
101 |
| Additional print tasks (Windows) |
102 |
| Cancel a print job with Windows |
102 |
| Print colored text as black (grayscale) with Windows |
102 |
| Print on special paper or labels with Windows |
102 |
| Print the first or last page on different paper with Windows |
104 |
| Scale a document to fit page size with Windows |
107 |
| Add a watermark to a document with Windows |
108 |
| Create a booklet with Windows |
109 |
| Additional print tasks (Mac OS X) |
110 |
| Cancel a print job with Mac |
110 |
| Change the paper size and type with Mac |
111 |
| Resize documents or print on a custom paper size with Mac |
111 |
| Use watermarks with Mac |
111 |
| Use HP ePrint |
111 |
| Use the HP ePrint Mobile Driver |
112 |
| AirPrint |
113 |
| Connect the printer with HP Wireless Direct |
114 |
| Connect and print from a WiFi capable mobile device |
114 |
| Connect and print from a WiFi capable computer over a wireless router and Wireless Direct |
115 |
| Connect and print from a WiFi capable computer over Wireless Direct only |
115 |
| Change from printing over USB to a Wireless Direct connection |
115 |
| Plug and Print USB Drive printing |
116 |
| Color |
119 |
| Adjust color |
119 |
| Change the color theme for a print job |
119 |
| Change the color options |
120 |
| Use the HP EasyColor option |
121 |
| Match colors to your computer screen |
122 |
| Print fade- and water-resistant prints |
123 |
| Copy |
125 |
| Use copy functions |
126 |
| Copy |
126 |
| Multiple copies |
126 |
| Copy a multiple-page original |
127 |
| Copy identification cards |
128 |
| Cancel a copy job |
129 |
| Reduce or enlarge a copy |
129 |
| Collate a copy job |
130 |
| Copy settings |
130 |
| Check the scanner glass for dirt and smudges |
130 |
| Adjust the lightness or darkness for copies |
131 |
| Define custom copy settings |
132 |
| Print or copy edge-to-edge |
132 |
| Set the paper size and type for copying on special paper |
132 |
| Copy photos |
133 |
| Copy mixed size originals |
133 |
| Copy on both sides |
134 |
| Copy on both sides automatically |
134 |
| Scan |
137 |
| Use scan functions |
138 |
| Scan methods |
138 |
| Scan to a USB drive |
138 |
| Scan an original from HP scanning software |
138 |
| Scan by using other software |
139 |
| Scan from a TWAIN-compliant program |
139 |
| Scan from a WIA-compliant program |
139 |
| Scan by using optical character recognition (OCR) software |
140 |
| Cancel a scan |
140 |
| Scan settings |
140 |
| Scanner resolution and color |
140 |
| Resolution and color guidelines |
141 |
| Lighter/Darker |
141 |
| Scan quality |
142 |
| Scan a photo to USB |
143 |
| Fax |
145 |
| Set up fax |
145 |
| Install and connect the hardware |
145 |
| Connect fax to a telephone line |
145 |
| Configure fax settings |
145 |
| Use the control panel to set the fax time, date, and header |
145 |
| Include common localized characters |
146 |
| Use the HP Fax Setup Wizard (Windows) |
146 |
| Use the phone book |
146 |
| Use speed dials |
147 |
| Create and edit speed-dial entries |
147 |
| Delete speed-dial entries |
147 |
| Manage group-dial entries |
148 |
| Create and edit group-dial entries |
148 |
| Set fax settings |
148 |
| Send-fax settings |
148 |
| Set special dialing symbols and options |
148 |
| Set a dialing prefix |
148 |
| Set tone-dialing or pulse-dialing |
149 |
| Set autoredial and the time between redials |
149 |
| Set light/dark and resolution |
150 |
| Set the light/dark setting |
150 |
| Set resolution |
150 |
| Cover-page templates |
151 |
| Receive-fax settings |
151 |
| Set fax forwarding |
151 |
| Block or unblock fax numbers |
151 |
| Set the number of rings-to-answer |
152 |
| Set distinctive ring |
153 |
| Use autoreduction for incoming faxes |
153 |
| Set the fax sounds volume |
154 |
| Set stamp-received faxes |
154 |
| Set fax polling |
154 |
| Use fax |
155 |
| Fax software |
155 |
| Supported fax programs |
155 |
| Cancel a fax |
155 |
| Cancel the current fax |
155 |
| Cancel a pending fax job |
155 |
| Use fax on a DSL, PBX, or ISDN system |
155 |
| DSL |
156 |
| PBX |
156 |
| ISDN |
156 |
| Use fax on a VoIP service |
156 |
| Fax memory |
157 |
| Fax memory contents are retained when there is a loss of power |
157 |
| Delete faxes from memory |
157 |
| Send a fax |
157 |
| Fax from the flatbed scanner |
157 |
| Fax from the document feeder |
158 |
| Use speed dials and group-dial entries |
159 |
| Send a standard fax from the computer |
160 |
| Send a fax from the software |
160 |
| Send a fax by dialing from a telephone connected to the fax line |
162 |
| Send a fax with confirmation |
162 |
| Schedule a fax to be sent later |
162 |
| Send a fax using monitor dialing |
163 |
| Use access codes, credit cards, or calling cards |
164 |
| Send faxes internationally |
164 |
| Receive a fax |
165 |
| Print a fax |
165 |
| Reprint a fax |
165 |
| Receive faxes when fax tones are audible on the phone line |
165 |
| Solve fax problems |
166 |
| Fax troubleshooting checklist |
166 |
| Fax error messages |
168 |
| Communication error. |
168 |
| Document feeder door is open. Canceled fax. |
168 |
| Fax is busy. Canceled send. |
168 |
| Fax is busy. Redial pending. |
169 |
| Fax receive error. |
169 |
| Fax Send error. |
170 |
| Fax storage is full. Canceling the fax receive. |
170 |
| Fax storage is full. Canceling the fax send. |
170 |
| No dial tone. |
171 |
| No fax answer. Canceled send. |
171 |
| No fax answer. Redial pending. |
171 |
| No fax detected. |
172 |
| Fax logs and reports |
173 |
| Print individual fax reports |
173 |
| Set the fax error report |
173 |
| Change error correction and fax speed |
174 |
| Set the fax-error-correction mode |
174 |
| Change the fax speed |
174 |
| Solve problems sending faxes |
174 |
| An error message displays on the control panel |
175 |
| The Communication error. message appears |
175 |
| No dial tone. |
175 |
| The Fax is busy. message appears |
176 |
| The No fax answer. message appears |
176 |
| Document feeder paper jam |
177 |
| The Fax storage is full. message appears |
177 |
| Scanner error |
177 |
| The control panel displays a Ready message with no attempt to send the fax |
177 |
| The control panel displays the message \ |
178 |
| Faxes can be received, but not sent |
178 |
| Unable to use fax functions from the control panel |
178 |
| Unable to use speed dials |
179 |
| Unable to use group dials |
179 |
| Receive a recorded error message from the phone company when trying to send a fax |
179 |
| Unable to send a fax when a phone is connected to the product |
180 |
| Solve problems receiving faxes |
181 |
| The fax does not respond |
181 |
| Voice mail is available on the fax line |
181 |
| The product is connected to a DSL phone service |
181 |
| The product uses a fax over IP or VoIP phone service |
181 |
| An error message displays on the control panel |
182 |
| The No fax detected. message appears |
182 |
| The Communication error. message appears |
182 |
| The Fax storage is full. message appears |
183 |
| A fax is received but does not print |
183 |
| The Private Receive feature is on |
183 |
| Sender receives a busy signal |
184 |
| A handset is connected to the product |
184 |
| A phone line splitter is being used |
184 |
| No dial tone |
184 |
| Cannot send or receive a fax on a PBX line |
184 |
| Solve general fax problems |
185 |
| Faxes are sending slowly |
185 |
| Fax quality is poor |
186 |
| Fax cuts off or prints on two pages |
186 |
| Regulatory information and warranties |
186 |
| Manage and maintain |
187 |
| Print information pages |
187 |
| Use the HP Embedded Web Server |
188 |
| About cookies |
189 |
| Open the HP Embedded Web Server |
189 |
| Features |
189 |
| Home tab |
190 |
| Scan tab |
191 |
| Fax tab |
191 |
| Web Services tab |
191 |
| Network tab |
192 |
| Tools Tab |
192 |
| Settings Tab |
192 |
| Use HP Web Jetadmin software |
192 |
| Product security features |
193 |
| Security statements |
193 |
| Assign an administrator password in the HP Embedded Web Server |
193 |
| Control Panel Lock |
193 |
| Disable unused protocols and services |
193 |
| Administrator Settings |
194 |
| Color Access Control |
194 |
| Protected Protocols – HTTPS |
195 |
| Firewall |
195 |
| Scan-to and Fax-to Folder Authentication |
195 |
| Syslog |
195 |
| Certificates |
195 |
| Signed Firmware |
195 |
| Wireless Authentication |
195 |
| Economy settings |
196 |
| Print with General Office mode |
196 |
| Power handling |
196 |
| Set Standby |
196 |
| Set Sleep After Standby |
196 |
| Schedule On/Off |
197 |
| Clean the product |
197 |
| Clean the printhead |
197 |
| Clean the printhead from the product control panel |
197 |
| Clean the scanner glass strip and platen |
197 |
| Clean the document feeder pickup rollers and separation pad |
198 |
| Clean the touch screen |
199 |
| Product updates |
199 |
| Solve problems |
201 |
| Customer support |
201 |
| Problem-solving checklist |
201 |
| Step 1: Check that the product power is on |
202 |
| Step 2: Check the control panel for error messages |
202 |
| Step 3: Test print functionality |
202 |
| Step 4: Test copy functionality |
202 |
| Step 5: Test the fax sending functionality |
203 |
| Step 6: Test the fax receiving functionality |
203 |
| Step 7: Try sending a print job from a computer |
203 |
| Step 8: Test the Plug and Print USB Drive printing functionality |
203 |
| Factors that affect product performance |
203 |
| Restore the factory-set defaults |
204 |
| Paper feeds incorrectly or becomes jammed |
205 |
| The product does not pick up paper |
205 |
| The product picks up multiple sheets of paper |
205 |
| Prevent paper jams |
205 |
| Clear jams |
206 |
| Jam locations |
206 |
| Clear jams from the document feeder |
207 |
| Clear jams in Tray 1(Multi-purpose tray) |
208 |
| Clear jams in Tray 2 |
212 |
| Clear jams in optional Tray 3 |
213 |
| Clear jams in the left door |
214 |
| Clear jams in the output bin |
216 |
| Clear jams in the duplexer |
217 |
| Improve print quality |
219 |
| Use the correct paper type setting in the printer driver |
220 |
| Change the paper type and size setting for Windows |
220 |
| Change the paper type and size setting for Mac |
220 |
| Adjust color |
220 |
| Change the color theme for a print job |
220 |
| Change the color options |
221 |
| Use paper that meets HP specifications |
224 |
| Check the ink cartridges |
224 |
| Refilled or remanufactured ink cartridges |
224 |
| Interpret the Print Quality Page |
225 |
| Inspect the ink cartridge for damage |
226 |
| Clean ink smears |
226 |
| Clean the printhead |
227 |
| Use the printer driver that best meets your printing needs |
227 |
| Improve print quality for copies |
228 |
| The product does not print or it prints slowly |
229 |
| The product does not print |
229 |
| The product prints slowly |
230 |
| Solve Plug and Print USB Drive printing problems |
230 |
| The USB Print menu does not open when you insert the USB accessory |
231 |
| The file does not print from the USB storage device |
231 |
| The file that you want to print is not listed in the USB Print menu |
231 |
| Solve product connectivity problems |
232 |
| Solve USB direct-connect problems |
232 |
| Solve network problems |
232 |
| Poor physical connection |
232 |
| The computer is using the incorrect IP address for the product |
232 |
| The computer is unable to communicate with the product |
233 |
| The product is using incorrect link and duplex settings for the network |
233 |
| New software programs might be causing compatibility problems |
233 |
| The computer or workstation might be set up incorrectly |
233 |
| The product is disabled, or other network settings are incorrect |
233 |
| Solve wireless network problems |
234 |
| Wireless connectivity checklist |
234 |
| The control panel displays the message: The wireless feature on this product has been turned off |
235 |
| The product does not print after the wireless configuration completes |
235 |
| The product does not print, and the computer has a third-party firewall installed |
235 |
| The wireless connection does not work after moving the wireless router or product |
236 |
| Cannot connect more computers to the wireless product |
236 |
| The wireless product loses communication when connected to a VPN |
237 |
| The network does not appear in the wireless networks list |
237 |
| The wireless network is not functioning |
237 |
| Solve product software problems with Windows |
237 |
| Solve product software problems with Mac |
238 |
| The printer driver is not listed in the Print & Scan list |
239 |
| The product name does not appear in the product list in the Print & Scan list |
239 |
| The printer driver does not automatically set up the selected product in the Print & Scan list |
239 |
| A print job was not sent to the product that you wanted |
239 |
| When connected with a USB cable, the product does not appear in the Print & Scan list after the driv ... |
239 |
| You are using a generic printer driver when using a USB connection |
240 |
| Supplies and accessories |
241 |
| Order parts, accessories, and supplies |
241 |
| Part numbers |
241 |
| Service and support |
243 |
| Hewlett-Packard limited warranty statement |
243 |
| End User License Agreement |
244 |
| OpenSSL |
246 |
| Customer support |
247 |
| Product specifications |
249 |
| Physical specifications |
250 |
| Power consumption, electrical specifications, and acoustic emissions |
250 |
| Acoustic emissions |
250 |
| Environmental specifications |
250 |
| Environmental product stewardship program |
253 |
| Protecting the environment |
253 |
| Ozone production |
253 |
| Power consumption |
254 |
| Paper use |
254 |
| Plastics |
254 |
| HP Officejet print supplies |
254 |
| Return and recycling instructions |
255 |
| United States and Puerto Rico |
255 |
| Multiple returns (more than one cartridge) |
255 |
| Single returns |
255 |
| Shipping |
255 |
| Residents of Alaska and Hawaii |
255 |
| Non-U.S. returns |
256 |
| Battery disposal |
256 |
| Printer recycling |
256 |
| Paper |
256 |
| Material restrictions |
256 |
| Disposal of waste equipment by users |
257 |
| Electronic Hardware Recycling |
257 |
| Chemical substances |
257 |
| Material Safety Data Sheet (MSDS) |
258 |
| For more information |
259 |
| Substances Table (China) |
259 |
| Restriction on Hazardous Substances statement (Turkey) |
259 |
| Restriction on Hazardous Substances statement (Ukraine) |
260 |
| Restriction on Hazardous Substances statement (Vietnam) |
260 |
| Regulatory information |
261 |
| Regulatory Notices |
261 |
| Regulatory model identification number |
261 |
| FCC Statement |
261 |
| VCCI statement (Japan) |
262 |
| Power cord instructions |
262 |
| Power cord statement (Japan) |
262 |
| EMC statement (Korea) |
262 |
| GS statement (Germany) |
263 |
| European Union Regulatory Notice |
263 |
| Additional statements for telecom (fax) products |
264 |
| EU Statement for Telecom Operation |
264 |
| New Zealand Telecom Statements |
264 |
| Additional FCC statement for telecom products (US) |
265 |
| Telephone Consumer Protection Act (US) |
266 |
| Industry Canada CS-03 requirements |
266 |
| Note à l’attention des utilisateurs du réseau téléphonique Canadien/notice to users of the Canadian ... |
267 |
| Australia Wired Fax Statement |
267 |
| Notice to users of the German telephone network |
267 |
| Vietnam Telecom wired marking for ICTQC Type approved products |
267 |
| Additional statements for wireless products |
267 |
| FCC compliance statement—United States |
267 |
| Notice to users in the US and Canada |
268 |
| Australia statement |
268 |
| Brazil ANATEL statement |
268 |
| Canadian statements |
268 |
| Japan statement |
269 |
| Korean statement |
269 |
| Taiwan statement |
269 |
| Mexico statement |
269 |
| Anonymous usage information storage |
269 |
| How do I? |
271 |

 1
1 103
103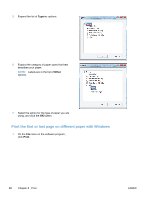 104
104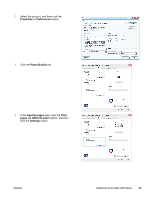 105
105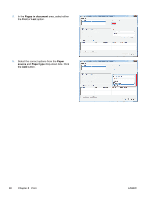 106
106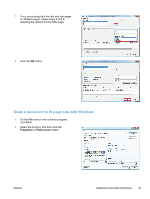 107
107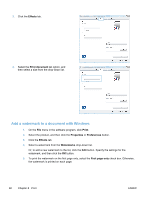 108
108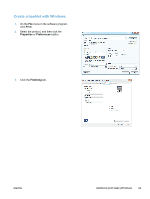 109
109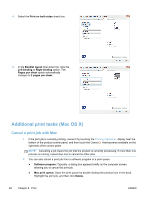 110
110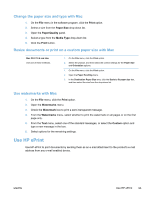 111
111 112
112 113
113

