HP Officejet Pro X476 HP Officejet Pro X476 and X576 - User Guide - Page 178
The control panel displays the message \, Faxes can be received, but not sent
 |
View all HP Officejet Pro X476 manuals
Add to My Manuals
Save this manual to your list of manuals |
Page 178 highlights
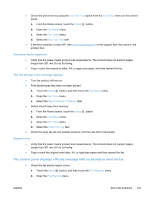
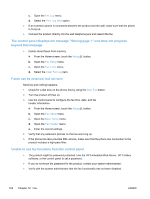
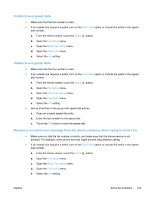
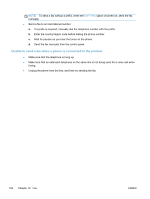
c. Open the Fax Log menu. d. Select the Print Log Now option. ● If an extention phone is connected between the product and the wall, make sure that the phone is hung up. ● Connect the product directly into the wall telephone jack and resend the fax. The control panel displays the message "Storing page 1" and does not progress beyond that message ● Delete stored faxes from memory. a. From the Home screen, touch the Setup button. b. Open the Fax Setup menu. c. Open the Fax Tools menu. d. Select the Clear Fax Log item. Faxes can be received, but not sent Send fax and nothing happens. 1. Check for a dial tone on the phone line by using the Start Fax button. 2. Turn the product off then on. 3. Use the control panel to configure the fax time, date, and fax header information. a. From the Home screen, touch the Setup button. b. Open the Fax Setup menu. c. Open the Basic Setup menu. d. Open the Fax Header menu. e. Enter the correct settings. 4. Verify that any extension phones on the line are hung up. 5. If the phone line also provides DSL service, make sure that the phone line connection to the product includes a high-pass filter. Unable to use fax functions from the control panel ● The product might be password protected. Use the HP Embedded Web Server, HP Toolbox software, or the control panel to set a password. ● If you do not know the password for the product, contact your system administrator. ● Verify with the system administrator that the fax functionality has not been disabled. 162 Chapter 12 Fax ENWW
-
 1
1 -
2
-
3
-
4
-
5
-
6
-
7
-
8
-
9
-
10
-
11
-
12
-
13
-
14
-
15
-
16
-
17
-
18
-
19
-
20
-
21
-
22
-
23
-
24
-
25
-
26
-
27
-
28
-
29
-
30
-
31
-
32
-
33
-
34
-
35
-
36
-
37
-
38
-
39
-
40
-
41
-
42
-
43
-
44
-
45
-
46
-
47
-
48
-
49
-
50
-
51
-
52
-
53
-
54
-
55
-
56
-
57
-
58
-
59
-
60
-
61
-
62
-
63
-
64
-
65
-
66
-
67
-
68
-
69
-
70
-
71
-
72
-
73
-
74
-
75
-
76
-
77
-
78
-
79
-
80
-
81
-
82
-
83
-
84
-
85
-
86
-
87
-
88
-
89
-
90
-
91
-
92
-
93
-
94
-
95
-
96
-
97
-
98
-
99
-
100
-
101
-
102
-
103
-
104
-
105
-
106
-
107
-
108
-
109
-
110
-
111
-
112
-
113
-
114
-
115
-
116
-
117
-
118
-
119
-
120
-
121
-
122
-
123
-
124
-
125
-
126
-
127
-
128
-
129
-
130
-
131
-
132
-
133
-
134
-
135
-
136
-
137
-
138
-
139
-
140
-
141
-
142
-
143
-
144
-
145
-
146
-
147
-
148
-
149
-
150
-
151
-
152
-
153
-
154
-
155
-
156
-
157
-
158
-
159
-
160
-
161
-
162
-
163
-
164
-
165
-
166
-
167
-
168
-
169
-
170
-
171
-
172
-
 173
173 -
 174
174 -
 175
175 -
 176
176 -
 177
177 -
 178
178 -
 179
179 -
 180
180 -
 181
181 -
 182
182 -
 183
183 -
184
-
185
-
186
-
187
-
188
-
189
-
190
-
191
-
192
-
193
-
194
-
195
-
196
-
197
-
198
-
199
-
200
-
201
-
202
-
203
-
204
-
205
-
206
-
207
-
208
-
209
-
210
-
211
-
212
-
213
-
214
-
215
-
216
-
217
-
218
-
219
-
220
-
221
-
222
-
223
-
224
-
225
-
226
-
227
-
228
-
229
-
230
-
231
-
232
-
233
-
234
-
235
-
236
-
237
-
238
-
239
-
240
-
241
-
242
-
243
-
244
-
245
-
246
-
247
-
248
-
249
-
250
-
251
-
252
-
253
-
254
-
255
-
256
-
257
-
258
-
259
-
260
-
261
-
262
-
263
-
264
-
265
-
266
-
267
-
268
-
269
-
270
-
271
-
272
-
273
-
274
-
275
-
276
-
277
-
278
-
279
-
280
-
281
-
282
-
283
-
284
-
285
-
286
-
287
-
288
 |
 |