HP Officejet Pro X476 HP Officejet Pro X476 and X576 - User Guide - Page 34
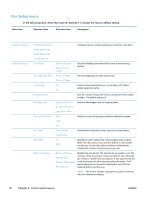
Fax Setup menu, In the following table
 |
View all HP Officejet Pro X476 manuals
Add to My Manuals
Save this manual to your list of manuals |
Page 34 highlights
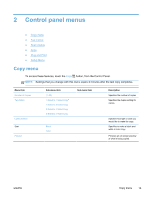
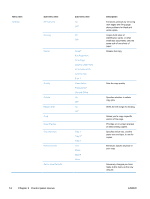
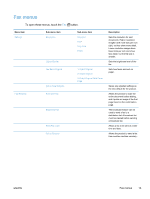
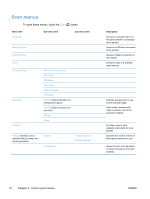
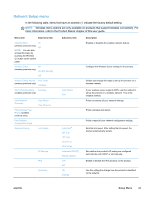
Fax Setup menu In the following table, items that have an asterisk (*) indicate the factory default setting. Menu item Sub-menu item Sub-menu item Description Speed-Dial Setup Basic Fax Setup Add/Edit Speed-Dial Group Speed-Dial Delete Speed-Dial Print Speed-Dial Fax Header Two-Sided Fax Print Auto Answer Rings to Answer Fax Paper Size Fax Sound Volume Dial Type Dial Prefix Block Junk Faxes Configures stored individual and group contact fax information. Enter your name. Enter your fax number. Sets the identifying information that is sent to the receiving product. Print on 1 Side* Print on 2 Sides Print incoming faxes for ease or economy. On* Receive faxes automatically (on) or manually (off). Default setting varies by country. Off Sets the number of rings that must occur before the fax modem answers. The default setting is 5. Letter (8.5 x 11in.) A4 (297 x 210 mm) Legal (8.5 x 14in.) Sets the default paper size for outgoing faxes. Soft* Loud Off Sets the volume for listening to initial fax connection signals. Tone Dialing* Pulse Dialing Sets whether the product should use tone or pulse dialing. On Specifies a prefix number that must be dialed when sending faxes from the product. If you turn this feature on, the product Off* prompts you to enter the number and then it automatically includes that number every time you send a fax. Block Junk Faxes Add Numbers Remove All Numbers Print Reports Modifies the junk fax list. The junk fax list can contain up to 100 numbers. When the product receives a call from one of the junk fax numbers, it deletes the incoming fax. It also logs the junk fax in the activity log with other job-accounting information. Print reports allows you to chose from printing the Junk Fax List, Caller ID History, and Fax Log. NOTE: This feature requires subscription of caller ID services with your telephone company. 18 Chapter 2 Control panel menus ENWW
-
 1
1 -
2
-
3
-
4
-
5
-
6
-
7
-
8
-
9
-
10
-
11
-
12
-
13
-
14
-
15
-
16
-
17
-
18
-
19
-
20
-
21
-
22
-
23
-
24
-
25
-
26
-
27
-
28
-
 29
29 -
 30
30 -
 31
31 -
 32
32 -
 33
33 -
 34
34 -
 35
35 -
 36
36 -
 37
37 -
 38
38 -
 39
39 -
40
-
41
-
42
-
43
-
44
-
45
-
46
-
47
-
48
-
49
-
50
-
51
-
52
-
53
-
54
-
55
-
56
-
57
-
58
-
59
-
60
-
61
-
62
-
63
-
64
-
65
-
66
-
67
-
68
-
69
-
70
-
71
-
72
-
73
-
74
-
75
-
76
-
77
-
78
-
79
-
80
-
81
-
82
-
83
-
84
-
85
-
86
-
87
-
88
-
89
-
90
-
91
-
92
-
93
-
94
-
95
-
96
-
97
-
98
-
99
-
100
-
101
-
102
-
103
-
104
-
105
-
106
-
107
-
108
-
109
-
110
-
111
-
112
-
113
-
114
-
115
-
116
-
117
-
118
-
119
-
120
-
121
-
122
-
123
-
124
-
125
-
126
-
127
-
128
-
129
-
130
-
131
-
132
-
133
-
134
-
135
-
136
-
137
-
138
-
139
-
140
-
141
-
142
-
143
-
144
-
145
-
146
-
147
-
148
-
149
-
150
-
151
-
152
-
153
-
154
-
155
-
156
-
157
-
158
-
159
-
160
-
161
-
162
-
163
-
164
-
165
-
166
-
167
-
168
-
169
-
170
-
171
-
172
-
173
-
174
-
175
-
176
-
177
-
178
-
179
-
180
-
181
-
182
-
183
-
184
-
185
-
186
-
187
-
188
-
189
-
190
-
191
-
192
-
193
-
194
-
195
-
196
-
197
-
198
-
199
-
200
-
201
-
202
-
203
-
204
-
205
-
206
-
207
-
208
-
209
-
210
-
211
-
212
-
213
-
214
-
215
-
216
-
217
-
218
-
219
-
220
-
221
-
222
-
223
-
224
-
225
-
226
-
227
-
228
-
229
-
230
-
231
-
232
-
233
-
234
-
235
-
236
-
237
-
238
-
239
-
240
-
241
-
242
-
243
-
244
-
245
-
246
-
247
-
248
-
249
-
250
-
251
-
252
-
253
-
254
-
255
-
256
-
257
-
258
-
259
-
260
-
261
-
262
-
263
-
264
-
265
-
266
-
267
-
268
-
269
-
270
-
271
-
272
-
273
-
274
-
275
-
276
-
277
-
278
-
279
-
280
-
281
-
282
-
283
-
284
-
285
-
286
-
287
-
288
 |
 |